Saturday, October 16, 2021

Electric Strike Installation Guide

Electric Strike Installation Guide 

Follow this guide and you will install a strike correctly everytime. As we detail in this post, installing electric strikes successfully is mostly good preparation, but when done right provides years of trouble-free use. We use our test door to walk through the practical installation steps needed to get it right. Even if you never will install a strike in your life, do you know if your doors are right enough?  In this note, we walk through the steps needed to get it right, everytime.

The Steps

The process of installing strikes correctly is not complicated, but care should be taken to perform each step:

  • Door/Frame Alignment
  • Strike Box/Jamb Prep
  • Strike Prep
  • Power Connections
  • Final Checks

If all the steps are followed, installing strikes can take minutes and involve minimal troubleshooting. We cover the steps in detail below:

Door/Frame Alignment

Making sure the door and frame is aligned is a critical pre-requisite.

Strike Box Preparation

The next step is to cut the frame so the strike fits. Even 'zero cutting' surface mount strikes used with surface hardware may require frame modification, and it's a sure step when using mortise mount strikes. We break down these steps into two parts depending on the frame:

  • Factory Notched Frames
  • Field Notched Frames

Factory Notched Frames: The scenario requiring the least amount of prep work is a door frame factory notched to work with a certain strike, as was the case with our door. However, even a factory notched requires filing down sharp edges and bending or adjusting mounting tabs so they do not interfere with the strike.

In our door, the strike pocket was slightly undersized so we had to use a file to enlarge the opening. When performing this step, test fitting the strike to the frame is helpful, with attention paid to potential spots where the frame touches the strike. Any pressure or tight fit can warp the strike or cause it to bind, and the strike should fit easily into the pocket.

Field Notched Frames: However, many frames are not factory built to work with strikes, and more drastic modifications are required. In many cases, the existing strike box (called a dust box) needs to be cut out to make room for the new strike. The strike's installation manual generally includes specific instructions to take when modifying the frame, and the needed cuts can be made with a high-speed rotary tool (like Dremel) for steel frames or with chisels for wood. The image below is a standard example of the prep dimensions:

A good instructional video on how to cut out a mortise strike into a wood frame can be found below:

Strike Prep

After the frame has been readied, fine tuning the strike for install is next. That process follows these points:

  • Fail Safe Configuration
  • Trim Plate Installation (optional)
  • Power Cabling

We cover these steps in the video below:

Fail Safe Adjustment: Many electric strikes are 'field adjustable' for either power failure condition. Changing from one state to the other usually entails changing position of springs, solenoids, or even small levers. In the case of our strike, you must change the position of two small screws hidden under a label:

Most strike installations will use a 'fail secure' position regardless of where they are installed, and this is the default condition most are shipped with. We confirmed our strike was configured correctly, and left it as shipped.

'Trim Plate' Installation: For sloppy cutouts that may be unsightly or slightly oversized, most mortise strikes ship with an optional trim piece that hides the cutout. This trim, called an 'enhancer' or 'skirt' provides no security or operational benefit, just serves to cosmetically improve sloppy preparation work.

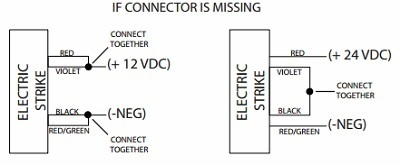
Power Cabling: Many strikes ship as 'Dual Voltage' compatible, meaning they operate given either 12 VDC or 24 VDC supplies. Some models include a dual voltage transformer in the housing with a single pigtail, while others are sold with two different pigtails trailing from the case. After confirming which supply voltage is available, the strike can be configured for use, typically involving twisting or jumping certain wire pairs together. The image below is the example wiring diagram for our strike:

Final Installation

At this point most of the work is complete and the payoff is close. There are just a few more check to make as the strike is finally installed into the frame:

  • Faceplate Selection
  • Power Connections
  • Installation/Shimming
  • Final Function Checks

These final steps are covered in the video below:

Faceplate Selection: Strikes generally ship with two or more faceplates, and selecting the correct one is critical during use. The 'keeper' area of the strike is bigger than the door lock's latches, and the faceplate narrows down the opening to match the specific type of door lock. This increases the 'tamper resistence' of the installation by eliminating potential gaps to insert prying tools behind the keeper.

Other door lock features, like the deadlatch, need a positive surface to rest on when the door is closed, and the faceplate provides this surface. Our strike was furnished with two options, and because it will be installed with a mortise lockset, we will use the 'mortise faceplate':

Power Connections: Power cabling for strikes should be 'run-to' rather than 'run-from' the strike. This means that the power cablings are most easily routed from the source (typically a controller), through the frame, down into the strike box. Especially when mortar shields are prepped into the frame, the actual opening to run cable out of the box is likely difficult to find. When using a fishtape or glowrods, they can be driven up and out of the frame, taped to the end of the cables, and the power leads are drawn down into the strike area.

Once the leads are in the box, they can be connected to the strike's pigtails. The image below shows our strike, which included a factory snap-style connector for both ends of the power splice:

Installation/Shimming: After power connections are made, the strike body should be inserted into the strike box, being careful not to pinch or crimp the cabling. If the prep beforehand has been done properly, this should be one of the easiest steps in the process:

The strike itself is not ready for use without sandwiching the faceplate down on top of the strike. At this point, with the faceplate seated onto the strike, it should be secured into the frame with the included screws or bolts. The strike itself should be square in the pocket, with no parts of the frame touching the strike except for the mounting tabs. 

If the strike appears to be too far forward or too far back into the frame, or if it can be 'wiggled' in the enclosure, then shims should be installed to take up the slack. Most strikes include shims and designate their installation locations without causing interference to the strike's action. The aim of shimming the strike is to give it a solid mount with the frame, not compensate for alignment issues. If those conditions are noted, then we recommend checking the squareness of the frame and alignment of the door.

Final Function Checks: At this point, the installer should check the strike's alignment with lock. Visually confirming the latches of the door lock are enclosed by the keeper is key. If the door latches do not physically make contact with any part of the strike when the door is shut, then the strike has been properly installed.

The goal of the installation is a strike flush mounted to the frame with no backpressure on the door's latches. If these situations are noted, the should be corrected before calling the job finished.

Final Thoughts

Most of strike installation is unglorious and even rough, but doing the basic prep work is necessary for trouble-free use. If the installer does a thorough job on the 98% preparation work, then actually installing the strike is an easy 2% effort.

If you have any question, contact us.

Friday, October 1, 2021

MINIMIZE VULNERABILITIES IN YOUR IP SECURITY CAMERA

MINIMIZE VULNERABILITIES IN YOUR IP SECURITY CAMERA 

A security consultant can act as an adviser for a building owner, occupant or property developer in relation to the design and incorporation of the security solutions. Clients typically require security consultants to advice on potential security threats and potential breaches, and to create contingency protocols to safeguard their organisation or assets. Every security consultant should guide about Camera vulnerabilities to there customers.

Internet Protocol (IP) cameras are an important component of state-of-the-art video surveillance systems. Unlike analog closed-circuit cameras, IP security cameras, which send and receive data through a computer network and the Internet, offer businesses a number of benefits. These benefits include the ability to monitor and control their video surveillance system remotely and a significant cost savings by allowing cloud storage of video files. However, like any device that is plugged into the Internet, without proper attention to cybersecurity, the same IP security cameras you have installed to improve security in your business may, in fact, be making it more vulnerable to physical and network attacks.

What are Hackers Looking For?

Hackers look for vulnerabilities to exploit, usually for malicious purposes. There are plenty of reasons why hackers might want to break into your IP security camera surveillance system, including some that promise potentially huge rewards:

·        They may be planning a burglary or a physical attack on your building or its occupants. If they can break into your network cameras, they can observe your physical security practices, including when guards come and go and where there are opportunities to enter the building. Once they know where and when to break in, your entire facility and all of its occupants are at risk.

·        They may want to take advantage of your business computing resources, such as your network’s processing power, for the purpose of stealing large data sets or more recently, mining cryptocurrencies.

·        To steal high-value trade secrets to sell to your competitors on the black market.

·        To steal personal information for the purposes of conducting phishing attacks to obtain credit card and banking information from individuals.

·        To install malware, such as keyloggers, to capture passwords as they are entered or ransomware that takes your system hostage until you pay the hacker to release it.

Are Your IP Security Cameras Vulnerable?

The short answer is yes. All security cameras are vulnerable to hacking. The unfortunate reality is that in today’s cybersecurity environment, the question is not whether your system will be hacked but when, which makes ongoing and proactive cybersecurity measures a must.

Hackers can break into your video surveillance system in a variety of ways. In addition to hacking the cameras themselves, they can get into your network through:

·        The computer operating system you use (e.g. Microsoft Windows, Linux, etc.)

·        The software your system uses, including digital video recording (DVR), network video recording (NVR), or video management system (VMS) software

·        Any firewall ports you may be using to access the system controls

Given these additional entry points, the security of your IP cameras depends not only on the cameras you use but also on the network technology and configuration of your system. In general, the relative security the system provides depends on how access is configured:

Most Secure — The safest system uses the local network equipped with a network firewall and virtual private network (VPN) software for access. With this type of system, the only way to get through the firewall is through a secure, encrypted connection.

An alternative to this would be to use a cloud-managed IP security camera. With this type of system, rather than opening the firewall and relying on a password to gain access to the camera on a local network, cloud-managed IP cameras are configured to communicate with a secured server in the cloud over an encrypted connection, and users gain access by linking up their devices with those servers. Cloud-managed devices offer a good alternative to locally networked systems because most cloud services monitor their servers continuously.

Least Secure — The least secure type of IP security camera is used in conjunction with a system that relies on port forwarding (China based OEM propose) for access, which allows users to access the camera through a network firewall with nothing other than a password. With this type of system, the only thing keeping a hacker out is the strength of the password used.

How to Protect Your IP Security Cameras

One of the most important things you can do to protect your IP security cameras is to know what you have and whether there are any known vulnerabilities. The CVE Security Vulnerabilities Database is a great place to start. This site tracks the vulnerabilities of all kinds of Internet of Things (IoT) devices and is searchable by the vendor (manufacturer), product and version, specific vulnerabilities and their severity. When checked regularly, this information can help you identify and address new issues with your IP security cameras so that you can address them more quickly.

A comprehensive set of cybersecurity best practices can go a long way to improving the security of your IP security cameras and your video surveillance system as a whole:

·        Contain and compartmentalize your internal networks. Creating separate networks for your video surveillance system and your information systems not only saves on bandwidth, but also minimizes risk should any part of your system be compromised.

·        If you are not already using a firewall, implement one as soon as possible.

·        Use a unique, long, and non-obvious password for each camera. This is critical if you are allowing access with a port forwarding system. If your system employs a VPN, however, having a single strong password for all cameras will suffice.

·        Change all passwords every 90 days at a minimum.

·        Enable two- or multi-factor authentication for your system, which requires the user to provide another piece(s) of information unique to the user, such as a code sent via text or phone, secret questions, etc. This is critically important if you are using a port forwarding system.

·        Develop and document cybersecurity guidelines and provide cybersecurity training to all employees who will have access to your video surveillance system.

·        Establish a cybersecurity incident response team so that you can swiftly and effectively respond to any breaches.

·        Stay on top of the operating system and software updates and apply them promptly when they come out.

·        If you use a cloud-based system, make sure you use a trusted provider.

·        Stay up-to-date with the latest cybersecurity standards.


Cybersecurity concerns are a long-standing issue for Hikvision, e.g., it was US government federally banned by the 2019 NDAA and the US government is planning to ban FCC authorizations for Hikvision, so this admission comes at a critical time for the company.

Researcher describes only access to the http(s) server port (typically 80/443) is needed. No username or password needed nor any actions need to be initiated by camera owner. It will not be detectable by any logging on the camera itself. This is the worst Hikvision vulnerability since Hikvision's backdoor was discovered in 2017 where Hikvision included a magic (ostensibly secret) string that allowed anyone with that string to perform admin operations, without having the device's admin credentials.

The attack can be executed via HTTP (port 80) or HTTPS (port 443). Once a camera has been compromised, the attacker can use it as a starting point to explore the rest of a victim’s network. Past attacks on connected cameras have also sought to enlist the devices into botnet armies capable of launching massive DDoS (distributed denial of service) attacks or spam campaigns.

This vulnerability is about as serious as they come, rated 9.8 out of 10 on the Common Vulnerability Scoring System (CVSS).

IPVM estimate 100+ million devices globally are impacted by this vulnerability making it, by far, the biggest vulnerability to ever hit video surveillance. The combination of its critical nature (9.8 / "zero-click unauthenticated remote code execution") and Hikvision's massive market size make this risk unprecedented.

For background, back in 2016, Hikvision said they manufactured "more than 55M cameras" and the annual output has grown substantially since. Hikvision has therefore shipped a few hundred million cameras and tens of millions of recorders during the time frame the vulnerability covers.

The end-users who buy these cameras are responsible for the data/video footage they generate. They are, in other words, the data custodians who process the data and are in control of the video footage, which is required to be kept private by law (under the GDPR). Secret access to video footage on these devices is impossible without the consent of the end-user.

Dahua is another in Ban list. Watch above video. https://youtu.be/MtkeaoS3jBc

Keeping Up with Cybersecurity Threats Can be Daunting

Hackers are relentless in their attacks and there is not a single industry today that is immune to them. Almost half of all cybercrimes are committed against small businesses, and it has been predicted that a business will fall victim to a ransomware attack every 14 seconds by 2019.

If you need help with your video surveillance system, SSA Integrate can help. Our security experts stay on top of the technology and all the best practices in cybersecurity so you don’t have to. We give importance of our customer data security.

If you are installing a new video surveillance system, we can help you select the right technology to meet your needs and ensure it is properly configured to provide the top level security you expect. We can also look at your current system to identify and eliminate any vulnerabilities and provide the monitoring and updates you need to keep your system secure. Whether you need five cameras or 500, SSA Integrate can help. Contact us today to learn more.

Ref:

https://www.forbes.com/sites/leemathews/2021/09/22/widely-used-hikvision-security-cameras-vulnerable-to-remote-hijacking/?sh=138e83062f31

https://ipvm.com/reports/hikvision-36260

https://cve.mitre.org/cgi-bin/cvename.cgi?name=CVE-2021-36260

https://watchfulip.github.io/2021/09/18/Hikvision-IP-Camera-Unauthenticated-RCE.html