We already discuss about CCTV lenses so, we have the basic idea now we learning in details:
The human eye is an incredibly adaptable device that can focus on distant objects and immediately refocus on something close by. It can look into the distance or at a wide angle nearby. It can see in bright light or at dusk, adjusting automatically as it does so. It also has a long ‘depth of field’; therefore, scenes over a long distance can be in focus simultaneously. It sees colour when there is sufficient light, but switches to monochrome vision when there is not. It is also connected to a brain that has a faster updating and retentive memory than any computer. Therefore, the eyes can swivel from side to side and up and down, retaining a clear picture of what was scanned. The brain accepts all the data and makes an immediate decision to move to a particular image of interest, select the appropriate angle of view and refocus. The eye has another clever trick in that it can view a scene of great contrast and adjust only to the part of it that is of interest.
By contrast, the basic lens of a CCTV camera is an exceptionally crude device. It can only be focused on a single plane, everything before and after this plane becoming progressively out of focus. The angle of view is fixed. At any time, it can only view a specific area that must be predetermined. The iris opening is fixed for a particular scene and is only responsive to global changes in light levels. Even an automatic iris lens can be only be set for the overall light level, although there are compensations for different contrasts within a scene. Another problem is that a lens may be set to see into specific areas of interest when there is much contrast between these and the surrounding areas. However, as the sun and seasons change so do light areas become dark and dark areas become light. The important scene can be ‘whited out’ or too dark to be of any use.
A controversial but important aspect of designing a successful CCTV system is the correct selection of the lens. The problem is that the customer may have a totally different perspective of what a lens can see compared to the reality. This is because most people perceive what they want to view as they see it through their own eyes. Topics such as identification of miscreants or numberplates must be subjects debated frequently between installing companies and customers.
The selection of the most appropriate lens for each camera must frequently be a compromise between the absolute requirements of the user and the practical use of the system. It is just not possible to see the whole of a large loading bay and read all the vehicle number plates with one camera. The solution may be more cameras or viewing just a restricted area of particular interest. A Company putting forward the system proposal should have no hesitation in pointing out the restrictions that may be incurred according to the combination of lens versus the number of cameras. Better this than an unhappy customer who is reluctant to pay the invoice.
Although a lens is crude compared to the human eye, it incorporates a high degree of technology and development. There can be a large variation in the quality between different makes and this should be considered according to the needs of a particular installation. The lens is the first interface between the scene to be viewed and the eventual picture on the monitor. Therefore, the quality of the system will be very much affected by the choice of lens. For general surveillance of, for instance, a small retail shop, it is possible to use a lower quality lens with quite acceptable results. As the demands of the system requirement increase then the use of a premium quality lens must be considered. The difference in cost between a poor quality and a high quality lens will be a very small percentage of the total cost of a large industrial system.
The CCTV Lens Exposure Control
The exposure in a normal photographic camera can be controlled by a combination of shutter speed and iris opening. This is not so with a CCTV camera lens. A standard CCTV camera produces a complete picture every 1/2 of the mains frequency. This is every 1/25 second where the mains frequency is 50 Hz (cycles per second) and every 1/30 second where the mains frequency is 60 Hz. Generally the exposure time is fixed and the only control of the amount of light passing to the imaging device is by adjusting the size of the iris. This is covered in more detail later in this chapter. Most camera tubes and imaging devices have some tolerance of the amount of light passed by the lens to create an acceptable picture. The range of tolerance is generally inversely proportional to the sensitivity of the camera. The more sensitive cameras require greater control of the iris aperture.
Types of Lenses
Lens Formats
Early CCTV lenses were designed for the 1” format tube camera and many of these are still available on the market. The lens screw thread on these cameras is called a C-mount. This is a particular design of thread size and flange length originally used on photographic cameras. In recent years lenses have been developed for the 2/3”, 1/2” and now 1/3” format cameras. Consequently, great care must be exercised when selecting a lens for a particular camera. Just as there are four formats of camera so there are four formats of lenses and they are not compatible in every combination. A lens designed for a larger format camera may be used on a smaller format but not the reverse. In addition, the field of view will not be the same on different size cameras. There is now a further complication in that there is a range of lenses with what is called the CS-mount. The difference between the two types of mount is the flange back length, which is the distance from the back flange of the lens to the face of the sensor. See diagram 4.1. The screw thread and shoulder length for each type of mount is identical. This makes it impossible to see the difference except that the overall size of the CS-mount lens is generally smaller. A C-mount lens may be used on a CS-mount camera with an adapter ring but a CS-mount lens cannot be used on a C-mount camera. The main problem is that either type of lens can be screwed onto both types of camera without apparent damage. The result is that if the wrong type is used it will be impossible to focus the camera. Some C-Mount lenses have a projection at the back that could damage the sensor in a CS-Mount camera.
Below chart is provided at the end of this chapter showing the relationships between different lenses and camera combinations and the associated angle of view. At the time of going to press, most lenses with a focal length of 25mm and above are still designed for 1” cameras. This means that special care must be taken when using this long focal length lens on modern cameras. For instance, a 25mm 1” lens provides the following approximate angles of view on the different formats. Therefore, there would be a significant variation in the expected scene content if this fact were overlooked.
FORMAT 1" -- ANGLE OF VIEW 29°
FORMAT 2/3" -- ANGLE OF VIEW 9.5°
FORMAT 1/2" -- ANGLE OF VIEW 11.4°
FORMAT 1/3" -- ANGLE OF VIEW 9.79°
How to select a Lens
There are two other main factors that must be considered when selecting the most appropriate lens for a particular situation. The focal length and the type of iris control. Within each of these factors, there are other features that will also need to be considered. Lenses may be obtained with all combinations of focal length and iris control. The selection will depend on the site and system requirement.
Focal Length
The focal length of a lens determines the field of view at particular distances. This can either be calculated from the formula given later in this chapter or found from tables provided by most lens suppliers. Most manufacturers also provide simple to use slide or rotary calculators that computes the lens focal length from the scene size and the object distance. The longer the focal length the narrower is the angle of view. Although not strictly correct, lenses with a focal length longer than 25mm are often called zoom lenses. The focal length of the lens requires careful selection to ensure that the correct area is in view and that the degree of detail is acceptable. A rule of thumb is that to ‘see’ a person on a monitor they should represent at least 10% of the screen height. To ‘see’ in this context means to be able to decide that it is a person. For purposes of being able to identify a known person requires them to be at least 50% of the screen height and preferably 60%. An unknown person should occupy at least 120%of the screen height.
Fixed Focal Length
This type of lens is sometimes called a monofocal lens. As the name implies, it is specified when the precise field of view is fixed and will not need to be varied when using the system. The angle of view can be obtained from the supplier’s specification or charts provided. They are generally available in focal lengths from 3.7mm to 75mm. Longer focal lengths may be produced by adding a 2x adapter between the lens and the camera. It should be noted that this would increase the f-number by a factor of two (reducing the amount of light reaching the camera). If focal lengths longer than these are required, it will be necessary to use a zoom lens and set it accordingly.
Except for very wide-angle lenses, other lenses have a ring for adjusting the focus. In addition, cameras include a focusing adjustment that moves the imaging device mechanically relative to the lens position. This is to allow for minor variations in the back focal length of lenses and manufacturing tolerances in assembling the device in the camera. Correct focusing requires setting of both these adjustments. The procedure is to decide the plane of the scene on which the best focus is required and then set the lens focusing ring to the mid position. Then set the camera mechanical adjustment for maximum clarity. Final fine focusing can be carried out using the lens ring.
The mechanical focusing on cameras is often called the back focus, originally because a screw at the back of the camera moved the tube on a rack mechanism. Modern cameras now have many forms of mechanical adjustment. Some have screws on the side or the top, some still at the back. There are cameras that have a combined C/CS-mount on the front that also has the mechanical adjustment and can accept either type of lens format. The longer the focal length of the lens the more critical is the focusing. This is a function of depth of field described later in this chapter.
Manual Zoom Lens
A zoom lens is one in which the focal length can be varied manually over a range. Usually this is by means of a knurled ring on the lens body. It has the connotation of ‘zooming in’ and therefore infers a lens with a longer than normal focal length. (Say more than 25mm.) The zoom ratio is stated as being for instance 6:1, which means that the longest focal length is six times that of the shortest. The usual way of describing a zoom lens is by the format size, zoom ratio and the shortest and longest focal lengths. For example, 2/3”, 6:1, 12.5mm to 75mm. Again, great care must be taken in establishing both the camera and the lens format. The lens just described would have those focal lengths on a 2/3” camera but an equivalent range of 8mm to 48mm on a 1/2” camera.
Variable Focal Length
This is a design of lens that has a limited range of manual focal length adjustment. It is strictly not a zoom lens because it has quite a short focal length. They are usually used in internal situations where a more precise adjustment of the scene in view is required which may fall between two standard lenses. They are also useful where for a small extra cost one lens may be specified for all the cameras in a system. This saves much installation time and the cost of return visits to change lenses if the views are not quite right. For companies involved in many small to medium sized internal installations such as retail shops and offices this can save on stock holding. It makes the standardisation of systems and costing much easier.
Motorised Zoom Lens
Manual zoom lenses are not widely used in CCTV systems because the angle of tilt of the camera often needs to be changed as the lens is zoomed in and out. The most common need for a zoom lens is where used with a pan tilt unit. The lens zoom ring is driven by tiny DC motors and operated from a remote controller.
With the development of ever-smaller cameras and longer focal length lenses the method of mounting the camera/lens combination must be considered. There are many cases where the lens is considerably larger than the camera and it may be necessary to mount the lens rigidly with the camera supported by it. In other cases, it may be necessary to provide rigid supports for both camera and the lens. Always check the relationship between the camera and lens sizes and weights when selecting a housing or mounting. Most manufacturers of housings can provide lens supports as an accessory.
Focussing A Zoom Lens
The most frequent reason for the focus changing when zooming is that the mechanical focus of the camera has not been set correctly. The following is the procedure for setting up the focus on a camera fitted with a zoom lens.
The focusing ring should be marked ‘near’ and ‘far’. Set this to ‘far’ and set the zoom ring to the widest angle of view. Aim the camera at an object about 40 metres away and adjust the camera focus for maximum clarity. Next zoom in to an object nearby and set the lens focus for maximum clarity. It should now be possible to zoom all the way back without the focus changing. Many motorised zoom lenses will be used in external conditions with limited light. If this is the case then it is advisable to fit a neutral density filter in front of the lens to make the iris open fully. A neutral density filter is one that reduces the amount of light that enters the lens, evenly over the whole of the visible spectrum. This will create the shortest depth of field and ensure setting up more accurately for the worst conditions. The depth of field, as explained later, depends on the aperture opening.
Some controllers can override the automatic iris mechanism, usually to open it to see into darker areas. This is often the case when a camera is looking out over open country in bright sunlight and the lens closes because it measures the average light levels. The scene at ground level can be very dark in these conditions, with little detail. This is not a desirable feature to include unless absolutely necessary. This is because the override can be forgotten with resultant poor pictures being recorded if the system is not fully monitored. The better solution is to tilt the camera down until there is less proportion of sky in the picture.
Motorised Zoom Lenses With pre-sets
There are many situations where it is required to pan, tilt, and zoom to a predetermined position within the area being covered. It is possible to obtain motorised lenses with potentiometers fitted to the zoom and focusing mechanisms. These cause the lens to zoom automatically and focus to the setting by measuring the voltage across the potentiometer and comparing it with the signals in the control system. All other functions are as for motorised zoom lenses. Pre-set controls are only possible with telemetry controlled systems. The specification of the telemetry controls should be checked to see whether the pre-set positions are set from the central controller or locally from the telemetry receiver.
Iris Control of Lens
Manual Iris
With this type of lens, the iris opening is set manually by rotating a knurled ring on the lens body. Typically, it will have a range of settings from the maximum to fully closed, although the adjustment will be rather coarse. This type of lens is only suitable for indoor applications where the light levels remain fairly constant. It can also be used indoors with cameras having electronic shutters making a significant cost saving. Care must be exercised in using this camera/lens combination in external applications because the camera may not have adequate control to cover the total light range. In addition, manual iris lenses do not usually have a neutral density spot filter to cope with extremely bright sunlight.
In many indoor situations, the general level of light will vary significantly between summer and winter due to light from windows, skylights, etc. Therefore, it is often necessary to adjust the aperture two or three times a year to maintain optimum clarity of the picture.
Automatic Iris
Due to ongoing development, tubed cameras were becoming more sensitive and their use was spreading to more outdoor applications. They were very limited in the range of light that could be coped with. To overcome this problem manual iris lenses were fitted with motors bolted on to the barrel to drive the iris ring. The motors were connected by way of an amplifier to the video output of the camera. This was monitored to adjust the iris ring according to the voltage of the video signal. The lower the voltage then the more the iris would be opened until the correct video voltage was achieved, and the reverse when the video voltage increased. The early amplifiers suffered from the problem of being too sensitive and responding too quickly to changes in the video signal. This caused ‘hunting’ of the iris opening control and resulted in fluctuating contrast of the picture. To overcome this a delay circuit was introduced in the amplifier but this sometimes caused the reverse problem of the picture changing too slowly.
Modern automatic iris lenses are now completely self-contained units produced by the lens manufacturer and containing very sophisticated electronics and microscopic motors. There are three main types of automatic iris lenses.
Iris Amplifier
This type of lens is sometimes referred to as a servo lens. The most common type contains an amplifier and is connected to the video signal of the camera. It is driven by a dc voltage also provided from the camera. It was mentioned in Chapter 3, that the voltage of the video signal is proportional to the amount of light on the imaging device. The video level falls in proportion to the light level. The amplifier is continuously monitoring this voltage to maintain it at 1-volt peak to peak. As the voltage changes so the iris amplifier opens or closes the iris to maintain a constant 1-volt.
Most cameras that provide an automatic iris drive include a socket on the rear. There are three connections, +v, 0v, video. Unfortunately, there is no current standard for this connector but most cameras are packed with the appropriate plug. This can create problems if one camera is substituted for another make during maintenance or service. It can mean that the service engineer has to change the iris plug on site, which is not an easy job. In recognition of this problem, many cameras are now being produced with screw terminals on the rear.
Sensor Lens
This lens includes a light sensor similar to that in a photographic camera. This measures the light levels and adjusts the iris aperture accordingly. It requires a 12-volt dc supply that may be obtained from any source. This type of lens is not very common now having been introduced for use on Vidicon cameras that did not have a video and 12 volt output. The problem was that the light sensor was pre-set and not responsive to the video level, therefore the correct level was always maintained. The vast majority of cameras now provide an automatic lens connection therefore there will only be rare cases where this lens will be required.
Galvanometric Lens
These are also known as a galvometric or galvano lens. This type of automatic iris lens is driven by a reference voltage produced by an amplifier in the camera. In other words, the amplifier is within the camera instead of being part of the lens. The lens contains a driving motor to open and close the lens and a damping coil to prevent hunting. These lenses have four connections, +ve drive, -ve drive, +ve damping, and -ve damping. The camera specification should be checked to ensure that it contains the circuitry for this type of lens. Galvanometric lenses are usually less expensive than lenses with a built-in amplifier. They are simpler to install but can only be used with a limited range of cameras. Again, for this type of lens many cameras are being produced with screw connectors instead of a socket for the lens connection.
Lens Parameters
Focal Length
The rays from infinitely distant objects are condensed by the lens at a common point on the optical axis. The point where the image sensor of the camera is to be placed is called the focal point. A lens has two focal points, the primary principal point and the secondary principal point. The distance between the secondary principal point and the plane of the image sensor is the focal length of the lens.
Angle of View of Lenses
This is the angle that the two lines from the secondary principal point make with the edges of the image sensor. The focal length of a lens is fixed whatever the size of the image sensor. The angle of view however varies according the size of the sensor.
 The angle of view is given by the following formula:
The angle of view for a given focal length lens varies according to the sensor size. This is shown in diagram 4. The corollary of this is that for a given view the required focal length varies according to the sensor size as shown in diagram 4.6. This illustrates that for the same field of view, the smaller the format the shorter is the required focal length.
Field Of View
The field of view is the ratio of the sensor size to the focal length and the distance to the subject. This is shown in diagram 4.7. The ‘width to height’ ratio of the sensor is 4:3. The horizontal and vertical angles and therefore fields of view are different and must be considered separately.
Sensor Sizes
Diagram 7.shows the sensor sizes to be used when calculating fields of view and angles of view.For example, if it were required to view a subject 2.5 M high at a distance of 10M using a 2/3” camera and lens the calculation would be as below.
The nearest standard lens in this case would be a 25mm and the actual height of the subject scene would be 2.64 M. The slightly shorter focal length lens provides a slightly wider angle of view.
 Most lens brochures give the horizontal and vertical angles of view. The relevant views can be calculated from the formula as follows:
Where: H is the height of the scene, d is the distance from the camera to the scene. This would give the vertical height of the scene using the vertical angle of view. Similarly, the horizontal width of the scene would be calculated from the horizontal angle of view.
Relationship Between Sensor Size and Lens Size
It can be very confusing to establish the actual field of view that will be obtained from a combination of sensor size and lens specification. Lenses are specified as designed for a particular sensor size. A lens designed for one sensor size may be used on a smaller size but not the reverse. The reason is that the extremities of the scene will be outside the area of the sensor. Many people in the CCTV industry have grown up with the 2/3” camera as the most popular and are familiar with the fields of view produced. However the 1/2” and 1/3” cameras are now being extensively used and therefore there are important factors that must be taken account.
Diagram 8. shows the effect of using one lens on two different sizes of sensor. The result of using a larger lens format on a smaller lens format is to create the effect of a longer focal length, which is a narrower angle of view.
Diagram 9. shows the result of using a lens designed for a 1/2” format on a 1/2” sensor. This is an important consideration when deciding the most appropriate lens for a required field of view. The design size of the lens must be related to the size of the sensor being used.
To summarise then:
1. A lens designed for one format may be used on a smaller format camera but will produce a narrower angle of view.
2. A lens designed for one format may not be used on a larger format camera.
3. Assuming a focal length has been assessed based on a particular format of camera and lens, and it is then decided to use a smaller format camera, the same field of view will only be obtained if a shorter focal length lens is used.
4. Always check the angle of view for the particular lens and camera combination it is intended to use.
5. Charts at the end of this chapter provide guidance on the selection of lenses and the relationship between different formats of camera and lenses.
Aperture
The size of the aperture is called the ‘f number’ of the lens, e.g. f1.4, f1.2, etc. This is a mechanical ratio of the lens components and is specified as:
 The effective diameter is related to the size of the front lens. Note that this is effective diameter and not the actual diameter. This is a measure of the amount of light that the lens will pass to the imaging device. As stated it is a ratio and does not refer to the quality of the lens. The smaller the number then the larger is the aperture. The figure given in specifications for lenses is the maximum aperture and this value is often followed by the minimum aperture. For instance, f1.4 -- f360, this second value being important if the camera is very sensitive such as an intensified sensor. Intensified cameras often require a minimum aperture as small as f1500. From the formula above it may be calculated that with a 16mm lens having the aperture set to f360 the effective diameter will be only 0.04mm. Even so, this could allow too much light to the sensor of an intensified camera and damage the tube or flare out the picture.
Having said that the f-number is a ratio, this does not imply that a lens with a lower number is better than one with a higher number. There are other factors that affect the light transmission through a lens. However, when comparing the major brands of lenses it is sufficient to use the f-number unless the application is especially demanding, where, for instance, image comparison or ultra fine resolution is necessary.
The efficiency of a lens and the amount of light it can transmit depend on many factors that lens designers must consider. However, ultimately a lens must be a commercial proposition and affordable to the CCTV installer and the customer. Two factors that affect the cost of a lens are the size of the glass elements and the number of elements. Therefore, it is less expensive to produce a 16mm f1.8 lens than it is to produce a 16mm f1.2. Consequently, some manufacturers produce the same focal length lens in two variations of f-number. For indoor conditions with ample light, or outdoor use in daylight only, the cheaper f 1.8 lens would be satisfactory and could represent a saving in cost. Exercise care in selecting the cheaper lens if the application is outdoors with low light conditions. As can be seen from this chapter, this would require nearly three times as much light as the f1.2 lens.
How aperture numbers are calculated
The scale of ‘f’ numbers, 1.4, 2.0, 2.8, 4, 5.6, etc. is such that successive numbers halve the amount of light passed to the sensor. These particular numbers are known as "full stops". This only applies to "full stops"; there are also half stops, which are numbers half way between full stops, and one-third stops In other words, the amount of light is proportional to the cross sectional area of the light rays entering the lens.
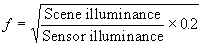 It can be shown that the f number,
 From this equation the following can be derived;

 If the illuminance is defined as ‘E’ lux, the equation can be shortened to;
If reflectance (R) is taken into account, this now becomes,
Another consideration is, how efficient is the lens at passing the maximum amount of light. There are several factors that determine the efficiency of a lens and of course they all cost money. When light passes through a glass/air boundary some is lost through reflection and refraction; this is reduced in the more expensive lenses. In addition, different light frequencies are refracted at different angles; special coatings are used to ensure that all frequencies are transmitted in parallel rays. The factor that measures the efficiency of a lens is known as the transparency ratio, (t) from which is calculated the transmission ratio (T).
The transparency ratio (t) is a function of the lens design and the number of glass elements. This is generally only available from the manufacturer. The transmission ratio (T) is the effective lens stop after adjusting for the transparency ratio (t) and is defined by
 The resulting number will always be larger than the specified f-number.
For example, an f-1.4 lens having a transparency ratio (t) of 0.785 would have an effective aperture of f 1.58. This would be the value to use when calculating the light transmitted through a lens rather than the published f-number. All reputable manufacturers should be able to provide information on the transmission ratios for their lenses.
If this is now taken into account, the relationship becomes.
 If an example is now worked using;
Transparancy ratio, t=0.785,
Reflectance, R=0.89,
Scene illumination, Escene=15 lux, Lens aperture, f=1.4,
Then, the light required on the sensor

The effect of sensor size
here is yet another factor that affects the efficiency of a camera/lens combination.
As stated in a previous article, light is energy measured in Watts per square Metre. Therefore, if the area of a sensor is known then the resultant power in watts can be calculated. The nominal areas of the sensors in common use are listed in table 2.
 Table 2, areas of sensors
The power produced by each individual pixel in the sensor is directly proportional to its area. If three cameras are considered each with the same resolution of say 500 lines then the number of pixels on each sensor must be the same. The result of this is that the pixels on each smaller size of sensor must also be smaller. Therefore, the power produced will be less for the same aperture setting, i.e. the same amount of light energy. It is assumed that the light energy to produce a full 1-volt pp video signal is 5.0 mW/M2
If for the sake of an example, a light source of 1,000 milliwatts per square Metre is passed to the sensor via an f-1.8 aperture lens. The amount of light passed by the lens will be 7.5% = 75 mW/M2. From this, the power output can be calculated for each sensor. This will be the power multiplied by the area of the sensor. The result is shown in table 3.
 Table 3-power output of sensors
Therefore the 1/2" and 2/3" sensors will be producing insufficient power for a full video signal. The answer is to use a lens with a larger aperture for these sensors so that more energy is passed to maintain the output power. This is summarised in table 4
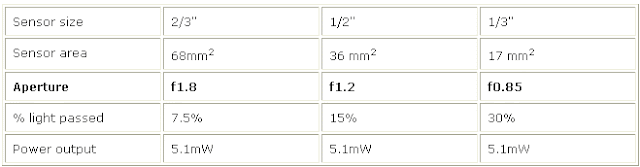 Table 4-power output corrected by lens f-stop
This is the reason that many 1/3" cameras have the sensitivity specified with an f-1.0 or sometimes an f 0.9 aperture. Beware though, there are only a limited number of lenses made to the 1/3" format. If the longer focal length lenses must be used they usually have smaller apertures (higher f-numbers) and pass less light energy.
The contra to this argument is that if a sensor of one size has the same size pixels as a larger one, then the light required will be the same. However the total number of pixels will be fewer and the resulting resolution will be proportionally less. There is no such thing as a free lunch!

The human eye is an incredibly adaptable device that can focus on distant objects and immediately refocus on something close by. It can look into the distance or at a wide angle nearby. It can see in bright light or at dusk, adjusting automatically as it does so. It also has a long ‘depth of field’; therefore, scenes over a long distance can be in focus simultaneously. It sees colour when there is sufficient light, but switches to monochrome vision when there is not. It is also connected to a brain that has a faster updating and retentive memory than any computer. Therefore, the eyes can swivel from side to side and up and down, retaining a clear picture of what was scanned. The brain accepts all the data and makes an immediate decision to move to a particular image of interest, select the appropriate angle of view and refocus. The eye has another clever trick in that it can view a scene of great contrast and adjust only to the part of it that is of interest.
By contrast, the basic lens of a CCTV camera is an exceptionally crude device. It can only be focused on a single plane, everything before and after this plane becoming progressively out of focus. The angle of view is fixed. At any time, it can only view a specific area that must be predetermined. The iris opening is fixed for a particular scene and is only responsive to global changes in light levels. Even an automatic iris lens can be only be set for the overall light level, although there are compensations for different contrasts within a scene. Another problem is that a lens may be set to see into specific areas of interest when there is much contrast between these and the surrounding areas. However, as the sun and seasons change so do light areas become dark and dark areas become light. The important scene can be ‘whited out’ or too dark to be of any use.
A controversial but important aspect of designing a successful CCTV system is the correct selection of the lens. The problem is that the customer may have a totally different perspective of what a lens can see compared to the reality. This is because most people perceive what they want to view as they see it through their own eyes. Topics such as identification of miscreants or numberplates must be subjects debated frequently between installing companies and customers.
The selection of the most appropriate lens for each camera must frequently be a compromise between the absolute requirements of the user and the practical use of the system. It is just not possible to see the whole of a large loading bay and read all the vehicle number plates with one camera. The solution may be more cameras or viewing just a restricted area of particular interest. A Company putting forward the system proposal should have no hesitation in pointing out the restrictions that may be incurred according to the combination of lens versus the number of cameras. Better this than an unhappy customer who is reluctant to pay the invoice.
Although a lens is crude compared to the human eye, it incorporates a high degree of technology and development. There can be a large variation in the quality between different makes and this should be considered according to the needs of a particular installation. The lens is the first interface between the scene to be viewed and the eventual picture on the monitor. Therefore, the quality of the system will be very much affected by the choice of lens. For general surveillance of, for instance, a small retail shop, it is possible to use a lower quality lens with quite acceptable results. As the demands of the system requirement increase then the use of a premium quality lens must be considered. The difference in cost between a poor quality and a high quality lens will be a very small percentage of the total cost of a large industrial system.
The CCTV Lens Exposure Control
The exposure in a normal photographic camera can be controlled by a combination of shutter speed and iris opening. This is not so with a CCTV camera lens. A standard CCTV camera produces a complete picture every 1/2 of the mains frequency. This is every 1/25 second where the mains frequency is 50 Hz (cycles per second) and every 1/30 second where the mains frequency is 60 Hz. Generally the exposure time is fixed and the only control of the amount of light passing to the imaging device is by adjusting the size of the iris. This is covered in more detail later in this chapter. Most camera tubes and imaging devices have some tolerance of the amount of light passed by the lens to create an acceptable picture. The range of tolerance is generally inversely proportional to the sensitivity of the camera. The more sensitive cameras require greater control of the iris aperture.
Types of Lenses
Lens Formats
 |
| Diagram 1 Types of Lens Mounts |
Below chart is provided at the end of this chapter showing the relationships between different lenses and camera combinations and the associated angle of view. At the time of going to press, most lenses with a focal length of 25mm and above are still designed for 1” cameras. This means that special care must be taken when using this long focal length lens on modern cameras. For instance, a 25mm 1” lens provides the following approximate angles of view on the different formats. Therefore, there would be a significant variation in the expected scene content if this fact were overlooked.
FORMAT 1" -- ANGLE OF VIEW 29°
FORMAT 2/3" -- ANGLE OF VIEW 9.5°
FORMAT 1/2" -- ANGLE OF VIEW 11.4°
FORMAT 1/3" -- ANGLE OF VIEW 9.79°
How to select a Lens
There are two other main factors that must be considered when selecting the most appropriate lens for a particular situation. The focal length and the type of iris control. Within each of these factors, there are other features that will also need to be considered. Lenses may be obtained with all combinations of focal length and iris control. The selection will depend on the site and system requirement.
Focal Length
The focal length of a lens determines the field of view at particular distances. This can either be calculated from the formula given later in this chapter or found from tables provided by most lens suppliers. Most manufacturers also provide simple to use slide or rotary calculators that computes the lens focal length from the scene size and the object distance. The longer the focal length the narrower is the angle of view. Although not strictly correct, lenses with a focal length longer than 25mm are often called zoom lenses. The focal length of the lens requires careful selection to ensure that the correct area is in view and that the degree of detail is acceptable. A rule of thumb is that to ‘see’ a person on a monitor they should represent at least 10% of the screen height. To ‘see’ in this context means to be able to decide that it is a person. For purposes of being able to identify a known person requires them to be at least 50% of the screen height and preferably 60%. An unknown person should occupy at least 120%of the screen height.
Fixed Focal Length
This type of lens is sometimes called a monofocal lens. As the name implies, it is specified when the precise field of view is fixed and will not need to be varied when using the system. The angle of view can be obtained from the supplier’s specification or charts provided. They are generally available in focal lengths from 3.7mm to 75mm. Longer focal lengths may be produced by adding a 2x adapter between the lens and the camera. It should be noted that this would increase the f-number by a factor of two (reducing the amount of light reaching the camera). If focal lengths longer than these are required, it will be necessary to use a zoom lens and set it accordingly.
Except for very wide-angle lenses, other lenses have a ring for adjusting the focus. In addition, cameras include a focusing adjustment that moves the imaging device mechanically relative to the lens position. This is to allow for minor variations in the back focal length of lenses and manufacturing tolerances in assembling the device in the camera. Correct focusing requires setting of both these adjustments. The procedure is to decide the plane of the scene on which the best focus is required and then set the lens focusing ring to the mid position. Then set the camera mechanical adjustment for maximum clarity. Final fine focusing can be carried out using the lens ring.
The mechanical focusing on cameras is often called the back focus, originally because a screw at the back of the camera moved the tube on a rack mechanism. Modern cameras now have many forms of mechanical adjustment. Some have screws on the side or the top, some still at the back. There are cameras that have a combined C/CS-mount on the front that also has the mechanical adjustment and can accept either type of lens format. The longer the focal length of the lens the more critical is the focusing. This is a function of depth of field described later in this chapter.
Manual Zoom Lens
A zoom lens is one in which the focal length can be varied manually over a range. Usually this is by means of a knurled ring on the lens body. It has the connotation of ‘zooming in’ and therefore infers a lens with a longer than normal focal length. (Say more than 25mm.) The zoom ratio is stated as being for instance 6:1, which means that the longest focal length is six times that of the shortest. The usual way of describing a zoom lens is by the format size, zoom ratio and the shortest and longest focal lengths. For example, 2/3”, 6:1, 12.5mm to 75mm. Again, great care must be taken in establishing both the camera and the lens format. The lens just described would have those focal lengths on a 2/3” camera but an equivalent range of 8mm to 48mm on a 1/2” camera.
Variable Focal Length
This is a design of lens that has a limited range of manual focal length adjustment. It is strictly not a zoom lens because it has quite a short focal length. They are usually used in internal situations where a more precise adjustment of the scene in view is required which may fall between two standard lenses. They are also useful where for a small extra cost one lens may be specified for all the cameras in a system. This saves much installation time and the cost of return visits to change lenses if the views are not quite right. For companies involved in many small to medium sized internal installations such as retail shops and offices this can save on stock holding. It makes the standardisation of systems and costing much easier.
Motorised Zoom Lens
Manual zoom lenses are not widely used in CCTV systems because the angle of tilt of the camera often needs to be changed as the lens is zoomed in and out. The most common need for a zoom lens is where used with a pan tilt unit. The lens zoom ring is driven by tiny DC motors and operated from a remote controller.
With the development of ever-smaller cameras and longer focal length lenses the method of mounting the camera/lens combination must be considered. There are many cases where the lens is considerably larger than the camera and it may be necessary to mount the lens rigidly with the camera supported by it. In other cases, it may be necessary to provide rigid supports for both camera and the lens. Always check the relationship between the camera and lens sizes and weights when selecting a housing or mounting. Most manufacturers of housings can provide lens supports as an accessory.
Focussing A Zoom Lens
The most frequent reason for the focus changing when zooming is that the mechanical focus of the camera has not been set correctly. The following is the procedure for setting up the focus on a camera fitted with a zoom lens.
The focusing ring should be marked ‘near’ and ‘far’. Set this to ‘far’ and set the zoom ring to the widest angle of view. Aim the camera at an object about 40 metres away and adjust the camera focus for maximum clarity. Next zoom in to an object nearby and set the lens focus for maximum clarity. It should now be possible to zoom all the way back without the focus changing. Many motorised zoom lenses will be used in external conditions with limited light. If this is the case then it is advisable to fit a neutral density filter in front of the lens to make the iris open fully. A neutral density filter is one that reduces the amount of light that enters the lens, evenly over the whole of the visible spectrum. This will create the shortest depth of field and ensure setting up more accurately for the worst conditions. The depth of field, as explained later, depends on the aperture opening.
Some controllers can override the automatic iris mechanism, usually to open it to see into darker areas. This is often the case when a camera is looking out over open country in bright sunlight and the lens closes because it measures the average light levels. The scene at ground level can be very dark in these conditions, with little detail. This is not a desirable feature to include unless absolutely necessary. This is because the override can be forgotten with resultant poor pictures being recorded if the system is not fully monitored. The better solution is to tilt the camera down until there is less proportion of sky in the picture.
Motorised Zoom Lenses With pre-sets
There are many situations where it is required to pan, tilt, and zoom to a predetermined position within the area being covered. It is possible to obtain motorised lenses with potentiometers fitted to the zoom and focusing mechanisms. These cause the lens to zoom automatically and focus to the setting by measuring the voltage across the potentiometer and comparing it with the signals in the control system. All other functions are as for motorised zoom lenses. Pre-set controls are only possible with telemetry controlled systems. The specification of the telemetry controls should be checked to see whether the pre-set positions are set from the central controller or locally from the telemetry receiver.
Iris Control of Lens
Manual Iris
With this type of lens, the iris opening is set manually by rotating a knurled ring on the lens body. Typically, it will have a range of settings from the maximum to fully closed, although the adjustment will be rather coarse. This type of lens is only suitable for indoor applications where the light levels remain fairly constant. It can also be used indoors with cameras having electronic shutters making a significant cost saving. Care must be exercised in using this camera/lens combination in external applications because the camera may not have adequate control to cover the total light range. In addition, manual iris lenses do not usually have a neutral density spot filter to cope with extremely bright sunlight.
In many indoor situations, the general level of light will vary significantly between summer and winter due to light from windows, skylights, etc. Therefore, it is often necessary to adjust the aperture two or three times a year to maintain optimum clarity of the picture.
Automatic Iris
Due to ongoing development, tubed cameras were becoming more sensitive and their use was spreading to more outdoor applications. They were very limited in the range of light that could be coped with. To overcome this problem manual iris lenses were fitted with motors bolted on to the barrel to drive the iris ring. The motors were connected by way of an amplifier to the video output of the camera. This was monitored to adjust the iris ring according to the voltage of the video signal. The lower the voltage then the more the iris would be opened until the correct video voltage was achieved, and the reverse when the video voltage increased. The early amplifiers suffered from the problem of being too sensitive and responding too quickly to changes in the video signal. This caused ‘hunting’ of the iris opening control and resulted in fluctuating contrast of the picture. To overcome this a delay circuit was introduced in the amplifier but this sometimes caused the reverse problem of the picture changing too slowly.
Modern automatic iris lenses are now completely self-contained units produced by the lens manufacturer and containing very sophisticated electronics and microscopic motors. There are three main types of automatic iris lenses.
Iris Amplifier
This type of lens is sometimes referred to as a servo lens. The most common type contains an amplifier and is connected to the video signal of the camera. It is driven by a dc voltage also provided from the camera. It was mentioned in Chapter 3, that the voltage of the video signal is proportional to the amount of light on the imaging device. The video level falls in proportion to the light level. The amplifier is continuously monitoring this voltage to maintain it at 1-volt peak to peak. As the voltage changes so the iris amplifier opens or closes the iris to maintain a constant 1-volt.
Most cameras that provide an automatic iris drive include a socket on the rear. There are three connections, +v, 0v, video. Unfortunately, there is no current standard for this connector but most cameras are packed with the appropriate plug. This can create problems if one camera is substituted for another make during maintenance or service. It can mean that the service engineer has to change the iris plug on site, which is not an easy job. In recognition of this problem, many cameras are now being produced with screw terminals on the rear.
Sensor Lens
This lens includes a light sensor similar to that in a photographic camera. This measures the light levels and adjusts the iris aperture accordingly. It requires a 12-volt dc supply that may be obtained from any source. This type of lens is not very common now having been introduced for use on Vidicon cameras that did not have a video and 12 volt output. The problem was that the light sensor was pre-set and not responsive to the video level, therefore the correct level was always maintained. The vast majority of cameras now provide an automatic lens connection therefore there will only be rare cases where this lens will be required.
Galvanometric Lens
These are also known as a galvometric or galvano lens. This type of automatic iris lens is driven by a reference voltage produced by an amplifier in the camera. In other words, the amplifier is within the camera instead of being part of the lens. The lens contains a driving motor to open and close the lens and a damping coil to prevent hunting. These lenses have four connections, +ve drive, -ve drive, +ve damping, and -ve damping. The camera specification should be checked to ensure that it contains the circuitry for this type of lens. Galvanometric lenses are usually less expensive than lenses with a built-in amplifier. They are simpler to install but can only be used with a limited range of cameras. Again, for this type of lens many cameras are being produced with screw connectors instead of a socket for the lens connection.
Lens Parameters
Focal Length
 |
| Diagram 2. Focal Length of Lenses |
 |
| Diagram 3. Angle of View |
This is the angle that the two lines from the secondary principal point make with the edges of the image sensor. The focal length of a lens is fixed whatever the size of the image sensor. The angle of view however varies according the size of the sensor.
 |
| Diagram 4 Angles of View for Different Sensor Sizes |
 |
| Diagram 5 Focal Lengths for Different Sensor Sizes |
Field Of View
 |
| Diagram 6. Field Of View |
Sensor Sizes
 |
| Diagram 7. Sensor Dimensions |
 |
The nearest standard lens in this case would be a 25mm and the actual height of the subject scene would be 2.64 M. The slightly shorter focal length lens provides a slightly wider angle of view.
Where: H is the height of the scene, d is the distance from the camera to the scene. This would give the vertical height of the scene using the vertical angle of view. Similarly, the horizontal width of the scene would be calculated from the horizontal angle of view.
Relationship Between Sensor Size and Lens Size
It can be very confusing to establish the actual field of view that will be obtained from a combination of sensor size and lens specification. Lenses are specified as designed for a particular sensor size. A lens designed for one sensor size may be used on a smaller size but not the reverse. The reason is that the extremities of the scene will be outside the area of the sensor. Many people in the CCTV industry have grown up with the 2/3” camera as the most popular and are familiar with the fields of view produced. However the 1/2” and 1/3” cameras are now being extensively used and therefore there are important factors that must be taken account.
 |
| Diagram 8. Effect of Sensor Size on View |
 |
| Diagram 9. Using a Correctly Matched Camera and Lens Format |
Diagram 9. shows the result of using a lens designed for a 1/2” format on a 1/2” sensor. This is an important consideration when deciding the most appropriate lens for a required field of view. The design size of the lens must be related to the size of the sensor being used.
To summarise then:
1. A lens designed for one format may be used on a smaller format camera but will produce a narrower angle of view.
2. A lens designed for one format may not be used on a larger format camera.
3. Assuming a focal length has been assessed based on a particular format of camera and lens, and it is then decided to use a smaller format camera, the same field of view will only be obtained if a shorter focal length lens is used.
4. Always check the angle of view for the particular lens and camera combination it is intended to use.
5. Charts at the end of this chapter provide guidance on the selection of lenses and the relationship between different formats of camera and lenses.
Aperture
The size of the aperture is called the ‘f number’ of the lens, e.g. f1.4, f1.2, etc. This is a mechanical ratio of the lens components and is specified as:
The effective diameter is related to the size of the front lens. Note that this is effective diameter and not the actual diameter. This is a measure of the amount of light that the lens will pass to the imaging device. As stated it is a ratio and does not refer to the quality of the lens. The smaller the number then the larger is the aperture. The figure given in specifications for lenses is the maximum aperture and this value is often followed by the minimum aperture. For instance, f1.4 -- f360, this second value being important if the camera is very sensitive such as an intensified sensor. Intensified cameras often require a minimum aperture as small as f1500. From the formula above it may be calculated that with a 16mm lens having the aperture set to f360 the effective diameter will be only 0.04mm. Even so, this could allow too much light to the sensor of an intensified camera and damage the tube or flare out the picture.Having said that the f-number is a ratio, this does not imply that a lens with a lower number is better than one with a higher number. There are other factors that affect the light transmission through a lens. However, when comparing the major brands of lenses it is sufficient to use the f-number unless the application is especially demanding, where, for instance, image comparison or ultra fine resolution is necessary.
The efficiency of a lens and the amount of light it can transmit depend on many factors that lens designers must consider. However, ultimately a lens must be a commercial proposition and affordable to the CCTV installer and the customer. Two factors that affect the cost of a lens are the size of the glass elements and the number of elements. Therefore, it is less expensive to produce a 16mm f1.8 lens than it is to produce a 16mm f1.2. Consequently, some manufacturers produce the same focal length lens in two variations of f-number. For indoor conditions with ample light, or outdoor use in daylight only, the cheaper f 1.8 lens would be satisfactory and could represent a saving in cost. Exercise care in selecting the cheaper lens if the application is outdoors with low light conditions. As can be seen from this chapter, this would require nearly three times as much light as the f1.2 lens.
How aperture numbers are calculated
The scale of ‘f’ numbers, 1.4, 2.0, 2.8, 4, 5.6, etc. is such that successive numbers halve the amount of light passed to the sensor. These particular numbers are known as "full stops". This only applies to "full stops"; there are also half stops, which are numbers half way between full stops, and one-third stops In other words, the amount of light is proportional to the cross sectional area of the light rays entering the lens.
If reflectance (R) is taken into account, this now becomes,
Another consideration is, how efficient is the lens at passing the maximum amount of light. There are several factors that determine the efficiency of a lens and of course they all cost money. When light passes through a glass/air boundary some is lost through reflection and refraction; this is reduced in the more expensive lenses. In addition, different light frequencies are refracted at different angles; special coatings are used to ensure that all frequencies are transmitted in parallel rays. The factor that measures the efficiency of a lens is known as the transparency ratio, (t) from which is calculated the transmission ratio (T).
The transparency ratio (t) is a function of the lens design and the number of glass elements. This is generally only available from the manufacturer. The transmission ratio (T) is the effective lens stop after adjusting for the transparency ratio (t) and is defined by
For example, an f-1.4 lens having a transparency ratio (t) of 0.785 would have an effective aperture of f 1.58. This would be the value to use when calculating the light transmitted through a lens rather than the published f-number. All reputable manufacturers should be able to provide information on the transmission ratios for their lenses.
If this is now taken into account, the relationship becomes.
Transparancy ratio, t=0.785,
Reflectance, R=0.89,
Scene illumination, Escene=15 lux, Lens aperture, f=1.4,
Then, the light required on the sensor
The effect of sensor size
here is yet another factor that affects the efficiency of a camera/lens combination.
As stated in a previous article, light is energy measured in Watts per square Metre. Therefore, if the area of a sensor is known then the resultant power in watts can be calculated. The nominal areas of the sensors in common use are listed in table 2.

The power produced by each individual pixel in the sensor is directly proportional to its area. If three cameras are considered each with the same resolution of say 500 lines then the number of pixels on each sensor must be the same. The result of this is that the pixels on each smaller size of sensor must also be smaller. Therefore, the power produced will be less for the same aperture setting, i.e. the same amount of light energy. It is assumed that the light energy to produce a full 1-volt pp video signal is 5.0 mW/M2
If for the sake of an example, a light source of 1,000 milliwatts per square Metre is passed to the sensor via an f-1.8 aperture lens. The amount of light passed by the lens will be 7.5% = 75 mW/M2. From this, the power output can be calculated for each sensor. This will be the power multiplied by the area of the sensor. The result is shown in table 3.

Therefore the 1/2" and 2/3" sensors will be producing insufficient power for a full video signal. The answer is to use a lens with a larger aperture for these sensors so that more energy is passed to maintain the output power. This is summarised in table 4

This is the reason that many 1/3" cameras have the sensitivity specified with an f-1.0 or sometimes an f 0.9 aperture. Beware though, there are only a limited number of lenses made to the 1/3" format. If the longer focal length lenses must be used they usually have smaller apertures (higher f-numbers) and pass less light energy.
The contra to this argument is that if a sensor of one size has the same size pixels as a larger one, then the light required will be the same. However the total number of pixels will be fewer and the resulting resolution will be proportionally less. There is no such thing as a free lunch!


