Showing posts with label Configuring the DVR. Show all posts

Saturday, August 3, 2013

Port Forwarding using a Linksys Router - Configuring the DVR

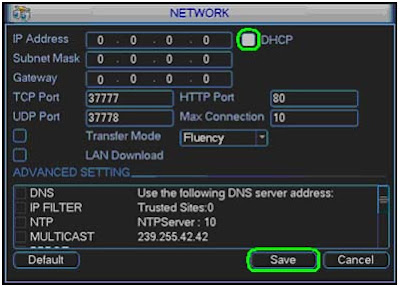
Configuring the DVR to pick up an IP address
1. Right Click and select Main Menu 
2. Select  Setting
3. Select Network
4. Check the box next to DHCP and click Save
5.  Select Shutdown
 6.  Set to Restart system and click OK

 7. Right Click and select Main Menu (Now we are Identifying the IP address) Then Select Settings, Then Select Network.


 8. Uncheck the box next to DHCP, write down the IP Address, Subnet Mask, and Gateway, and click Save


To setup port forwarding on this router your computer needs to have a static ip address.
Or you can take alook at our Static IP Address guide to setup a static ip address. When you are finished setting up a static ip address, please come back to this page and enter the ip address you setup in the Static IP Address box below.


Open a web browser like Internet Explorer or Firefox. Enter the internal IP address of your router in the address bar of your browser.

In the picture above the address bar has http://www.google.com in it. Just replace all of that with the internal IP address of your router. By default the IP address should be set to 192.168.1.1. 
You should see a box prompting you for your username and password. Enter your username and password now. By default the username is admin, and the password is admin. Click the Ok button to log in to your router.


Click the Applications & Gaming link near the top of the page. 
You should now see a new menu. In this new menu, click Port Range Forwarding.


We will list a series of lines here that will show you exactly how to forward the ports you need to forward. Some DVR requires you to forward the following ports: 80,37777,37778. Go ahead and enter the settings shown above into the Port Range Forwarding menu. 


When you're finished, click Save Settings near the bottom of the screen to save your changes
 
And that's it! You're done!

Wednesday, November 3, 2010

How to Reset / Recover / Change Forgotten Administrator Password in Windows?

Many times we face this problem when we or our friends forget Administrator account password in Windows and can't log into Windows. So here we are posting a few methods which can be used to change, reset or recover forgotten Windows password in Windows.

DISCLAIMER: Following information should be used only if its your system and you have forgotten account password. Don't use this information to access a system which is not yours without permission.

Method 1: Using Welcome or Login Screen
This method is the first thing which should always do whenever you forget your Windows login password. When we install Windows, it automatically creates a hidden user account"Administrator" and sets its password to blank. So if you forget your user account password then try this:

1. Start your computer and when you see Windows Welcome screen (Login screen), press <ctrl>+<alt>+<del> keys twice and it'll show Classic Login box.
2. Now type Administrator in Username box and leave Password box empty. Now press Enter and you should be able to log into Windows.
3. Now you can reset your account password from "Control Panel -> User Accounts".
Same thing can be done using Safe Mode. In Safe Mode Windows will show this in-built Administrator account in Login screen.
Method 2: Using Password Reset Disk
Windows XP and later Windows versions provide a built-in method to recover forgotten password by using "Password Reset Disk". If you created a Password Reset Disk in past, you can use that disk to reset the password.
If you don't know how to create a password reset disk, lets tell you in details. You can create the password reset disk using Control panel -> User Accounts applet.
First open Control Panel and click on User Accounts icon. It'll open User Accounts window. Now click on your user account and then click on "Prevent a forgotten password" link given in left-side pane. It'll open forgotten password wizard as shown in following screenshot:
Follow the instructions and you'll have a password reset disk in your hand.
Method 3: Using "Net User" DOS Command
You can also use a built-in DOS command "Net User" to change any desired user account password within seconds. You'll need access to Command Prompt window in this method:
1. Open Command Prompt as Administrator as mentioned here and run following command:
net user
2. It'll list all available user accounts in Windows.
3. Now run following command:
net user user_name new_password
Replace "user_name" with the desired user account name and replace "new_password" with your desired password.
For example:
net user "Arindam Bhadra" 12345
Here "Arindam Bhadra" is the user account name and 12345 is the new password.
4. That's it. It'll immediately change the user account password.
Method 4: Using Windows XP Setup Loophole
If the above mentioned tricks don't work for you, try following trick which is actually a loophole in Windows XP Setup and also a big security hole:
1. Boot using Windows XP Setup CD and follow the instruction like Accepting EULA, etc.
2. When it asks to repair your existing Windows installation, accept it and press "R" key to run the repair.
3. Setup will start repairing your Windows and will start copying files, etc.
4. After a few minutes setup will restart your system and when it restarts, don't press any key when it shows "Press any key to continue...". Otherwise Setup will start from the beginning. Don't press any key and setup will resume where it left.
5. Now it'll start doing other tasks and will show a small progressbar with a few details in left side.
6. Look carefully at the details and when it shows "Installing devices", press <Shift>+F10 keys together in your keyboard.
7. It'll open a Command Prompt window. Now type nusrmgr.cpl and press <Enter> key.
8. It'll open the same "User Accounts" window which you see in Control Panel.
9. Now you can remove or reset any account password without any problem.
Method 5: Using Bootable Rescue Disk
You can also use various bootable rescue CDs to reset your Windows password as mentioned in following link:
Method 6: Perform a Clean Installation of Windows
If all fails, simply reinstall Windows and create new user account. To recover lost data, you can use Data recovery tools available on net but the chances will be less to get your data back.
That's all we can suggest. If you know about any other method or tool, feel free to share it in your comment.....

Wednesday, October 6, 2010

How To Setup Two or More Routers Together

One of the most common issues people encounter is when they have more than one router hooked up. Sometimes people don't realize their modem is also a router (Such as DSL) and other times people hook up an extra router to use things their router/modem doesn't have, such as wireless.

So now with 2 or more routers hooked up people start to realize port forwarding & port triggering isn't working. This is because they are only setting up the port forwarding or triggering in one router, which is what they should be doing! Now let me explain, no one wants to setup port forwarding & triggering rules in two or more routers, they should only need to do it in one, making things simple. But you may ask "If I have more than one router how can I keep it simple?" The answer: DMZ

First off DMZ is supported by nearly every router/modem out there. What DMZ does is allow you to tell the router to forward all incoming connections to a single IP address. So in this case we will setup DMZ in the first router to point to the second router. Now all incoming connections are sent to the 2nd router and thus your port forwarding & triggering will work again.

So here is a quick example. I log into router 1 and go to the DMZ settings and put the WAN IP address of the 2nd router there. Now router 1 is out of the way for port forwarding and triggering as all incoming connections are now being forwarded to router 2. Now in router 2 I can setup my port forwarding & triggering rules just like normal.
So here is a quick step by step.
Step 1. Login into your Router
Step 2. Find the status page that shows the WAN/Internet IP address and write it down. (The Gateway IP will be the IP needed to log into the first router/modem.)
Step 3. Log into the first router/modem now.
Step 4. Find the DMZ page
Step 5. Enter the IP you wrote down into the DMZ page and enable DMZ.
Step 6. Save and you’re done.

Quick Tip: You should setup a static WAN IP address for router 2. If you leave it on DHCP the IP could change thus breaking the DMZ and of course breaking the port forwarding & triggering. This doesn't happen very often, but it is always a possibility.


If you want to Setup 3 routers at home. Here is my plan to setup. Please let me know if it make sense.
1.    SMC. It is a modern with router. It locates in the first floor, Rogers cable connected to this router. It is the main router to connect outside. I turned off the wireless on the router. It has 4 ports connected to SMC all with wires. First one connect to D-615(second router) Second one connect to D-815(third router) Third one connect to WD Mybook live(NAS HHD) Fourth one connect to TV player
2.    DLink 615. It is a wireless router. It located in the first floor as well, but close to bedroom. It has 4 ports, but I only use 3 of them connected to PC. Also there are wireless device need connect to this router as well.
3.    DLInk 815. It is a wireless router. It located in the second floor. It connected with 3 PCs and also accept wireless connection. The signal in second floor is very weak if using D-615 wireless connection.
I setup the SMC to 192.168.0.1 with DHCP, D-615 to 192.168.2.1 with DHCP and D-815 to 192.168.1.1. I cannot get rid of the second router, since SMC doesn't have enough wired port. And I need to D-815 because the signal problem. Wondering if this gonna work? Thanks.