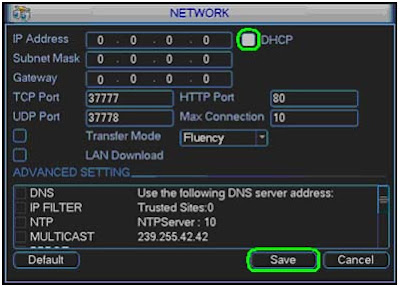
Configuring the DVR
to pick up an IP address
1. Right Click and select Main Menu
2. Select Setting
3. Select Network
4. Check the box next to DHCP and click Save
5. Select Shutdown
6. Set to Restart system and click OK
7. Right Click and select Main Menu (Now we are Identifying the IP address) Then Select Settings, Then Select Network.
8. Uncheck the box next to DHCP, write down the IP Address, Subnet Mask, and Gateway, and click Save
Open a web browser like Internet Explorer or Firefox. Enter the internal IP address of your router in the address bar of your browser.
And that's it! You're done!
1. Right Click and select Main Menu
2. Select Setting
3. Select Network
4. Check the box next to DHCP and click Save
5. Select Shutdown
6. Set to Restart system and click OK
7. Right Click and select Main Menu (Now we are Identifying the IP address) Then Select Settings, Then Select Network.
8. Uncheck the box next to DHCP, write down the IP Address, Subnet Mask, and Gateway, and click Save
To setup port forwarding
on this router your computer needs to have a static ip address.
Or you can take alook at our Static IP Address guide to setup a static ip address. When you are finished setting up a static ip address, please come back to this page and enter the ip address you setup in the Static IP Address box below.
Or you can take alook at our Static IP Address guide to setup a static ip address. When you are finished setting up a static ip address, please come back to this page and enter the ip address you setup in the Static IP Address box below.
Open a web browser like Internet Explorer or Firefox. Enter the internal IP address of your router in the address bar of your browser.
In the picture above the address bar has
http://www.google.com in it. Just replace all of that
with the internal IP address of your router. By default the IP address should
be set to 192.168.1.1.
You should see a box
prompting you for your username and password. Enter your username and password
now. By default the username is admin,
and the password is admin.
Click the Ok
button to log in to your router.
Click the Applications & Gaming link near the
top of the page.
You should now see a new menu. In this new
menu, click Port Range
Forwarding.
We will list a series of lines here that will
show you exactly how to forward the ports you need to forward. Some DVR
requires you to forward the following ports:
80,37777,37778. Go ahead and enter the settings shown above into the Port Range Forwarding
menu.
When you're finished,
click Save
Settings near the bottom of the screen to save your changes.
And that's it! You're done!


11 comments:
This is Very Use-full for our Engineer & who deal with core-technical field.
Great Post Arindam.
we salute you sir.
- Patrick Moore
Kingdom of Sweden
usefull info...
Thanks for sharing anpr and gate barrier system in dubai
I found this informative and interesting blog, I think it is very useful and knowledgeable. I would like to thank you for the efforts you have made in writing this article.
Linksys Smart WiFi Login
Linksys RE6400 Setup
Extender.Linksys.com
Linksys RE6500 Setup
Linksys RE6300 Setup
Linksys Wireless Range Extender setup
linksys velop
linksys range extender
Looking for technical number, visit on: technical number
Thank a lot for this post that was very interesting. Keep posting like those amazing posts, this is really awesome :)
Looking for Linksys Support, visit on:
Linksys Customer Service
Steps to Reset Linksys Router
The Linksys Extender Setup is a gadget that gives an astounding answer for poor or no sign issues. It helps in broadening the remote scope of your principle switch. Thus, it goes about as an organization repeater for the remote sign. These extenders let you rehash the remote signs of any passage for better network and speed. In addition, you can think about it as an extension for wired gadgets.The Linksys Extender Setup measure is basic and clear. It doesn't expect you to go or settle any specialized
Linksys Extender Setup || Cash App Login || Amazon.com/code || Bitdefender Login || Roadrunner Email || TPLinkWifi || TP Link Login || TP Link Drivers || Belkin Setup || Tomtom Update || Avast Login || AOL Mail || my.avast.com || Netgear Extender Setup || Amazon Prime Login || Ij.start.cannon || www.amazon.com/mytv || Norton Download || Outlook 365 login
TPLinkWifi is a high velocity web association and organization association without the utilization of any links or wires. The remote organization is working three fundamental components that are radio signs, recieving wire, and switch. The radio waves are keys that make Wi-Fi organizing conceivable. The PCs and mobile phones are prepared with TPLinkWifi cards. TPLinkWifi similarity has been utilizing another creation to constituent inside the ground associated with local area organization.
TPLinkWifi || TP Link Login || TP Link Drivers || Cash App Login || Linksys Extender Setup || Belkin Setup || Avast Login || TomTom Update || Avast Login || AOL Mail || My.Avast.Com || Netgear Extender Setup || Amazon.com/code || Bitdefender Login || Roadrunner Email || Amazon Prime Login || Ij.start.cannon || www.amazon.com/mytv || Norton Download || Outlook 365 login
If you are looking for Linksys Router Support call on 1800987893 , visit on: Linksys Support
Very Helpful. Thanks for such Information
Linksys Support
Linksys Technical Support
Great . Thanks for such Information
Linksys Customer Support Service
Linksys Tech Support
Post a Comment