How
to access your HikVision NVR or Camera on Android devices
Closed-circuit
television (CCTV), also known as video surveillance, is the use
of video cameras to transmit a signal to a specific place, on a
limited set of monitors. It differs from broadcast television in that
the signal is not openly transmitted, though it may employ point-to-point
(P2P), point-to-multipoint (P2MP), or mesh wired or wireless
links but transmit a signal to a specific place only. Not for open to all. This
article I write just for HikVision Lover only. Personally I am not support to
install Hikvision/Dahua product or OEMN product. Technically 100% unsafe your
personal video data.
Day by Day increase
hacking of video surveillance camera. Now cyberattacks on CCTV systems making
news headlines on a weekly basis of late, there is a good deal of concern and
uncertainty about how at risk these systems are, as well as why they are being
attacked.
In 2014, a US ally
observed a malicious actor attacking the US State Department computer systems.
In response the NSA traced the attacker’s source and infiltrated their computer
systems gaining access to their CCTV cameras from where they were able to
observe the hackers’ comings and goings.
In October 2016,
600,000 internet connected cameras, DVR’s, routers and other IoT devices were
compromised and used to for a massive Bot Net to launch what was the largest
Denial of Service (DOS) attack the internet had experienced to date.
In the lead up to the
2017 US Presidential inauguration, 65 per cent of the recording servers for the
city of Washington CCTV system were infected with ransomware. How did the
attack take place? Whilst unknown, it most likely occurred by the same means as
other common PC hacks such as infected USB keys, malicious web sites, or
phishing attacks.
May, 2018, over 60
Canon cameras in Japan were hacked with “I’m Hacked. bye2” appearing in the
camera display text. How did the attack take place? Simple. IP cameras
were connected to the internet and were left on default credentials. It appears
that the hackers logged into the cameras and changed the on-screen display.
What was the impact? Other the defacement of the camera displays and some
reputational damage, there doesn’t seem to have been much impact from these
attacks.
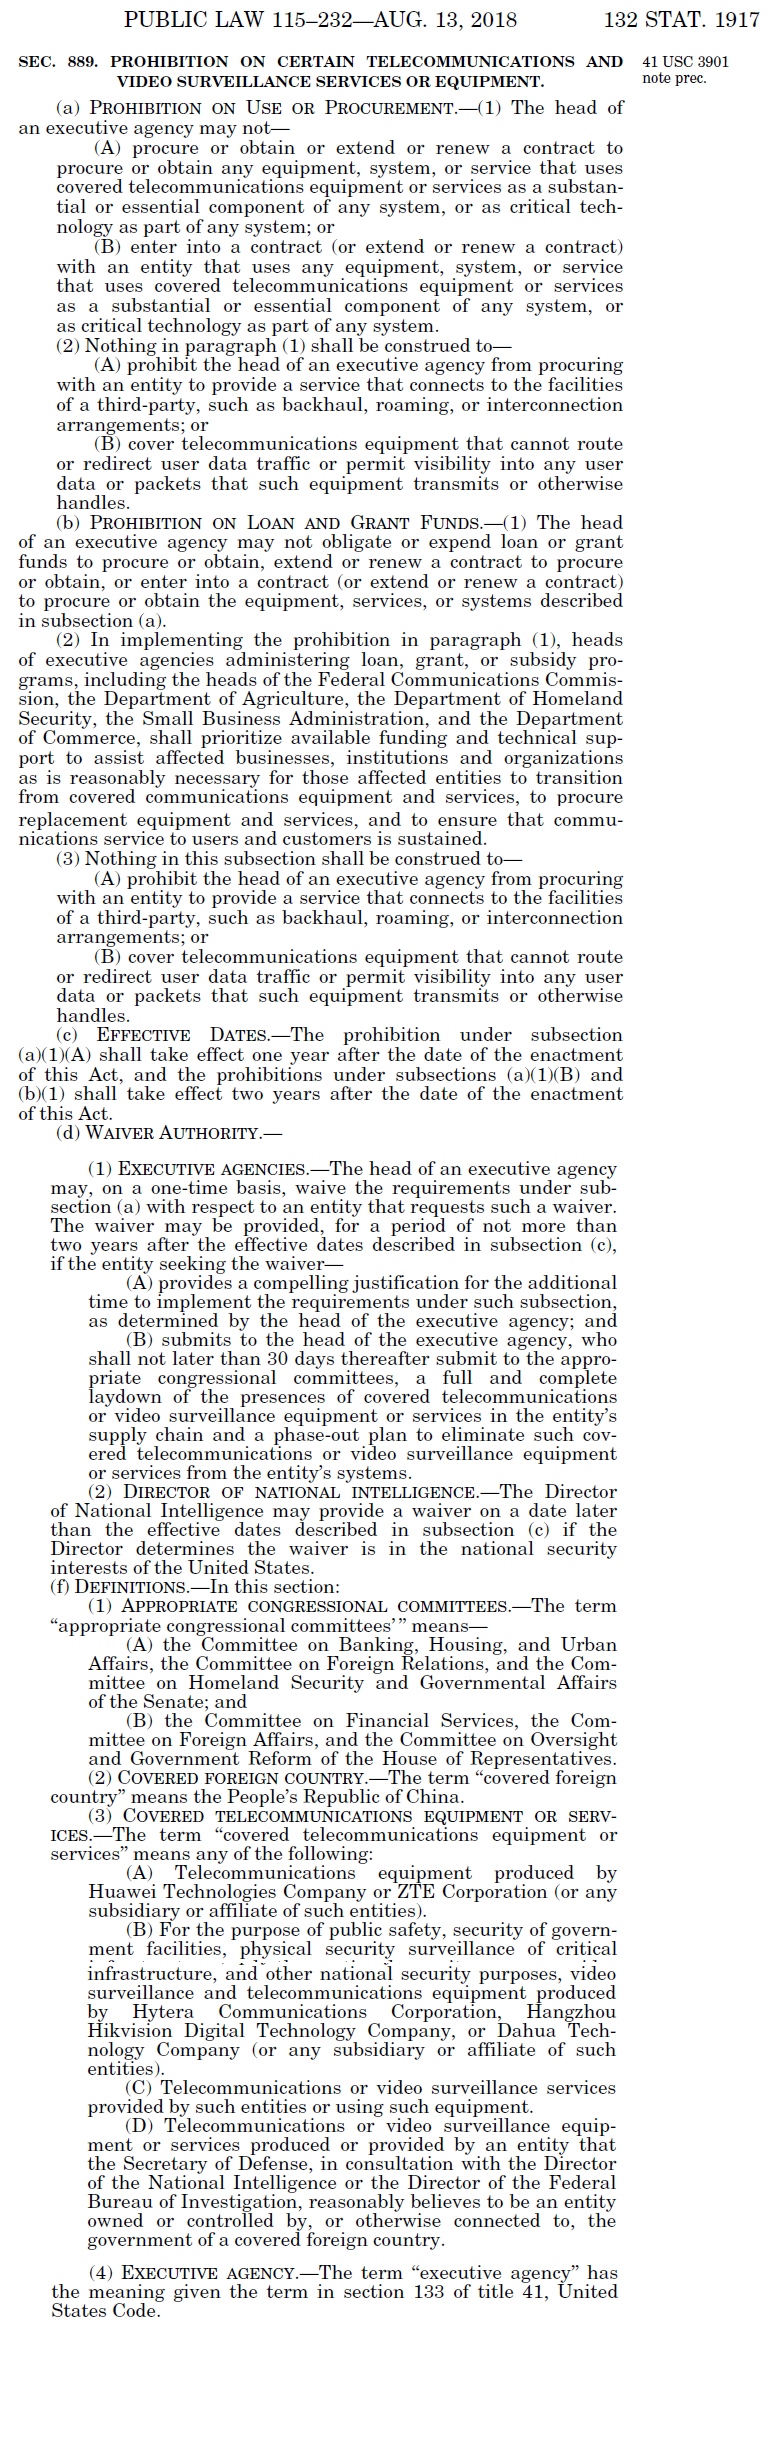
On Aug 13, 2018,
The US President has signed the 2019 NDAA into law, banning the use of
Dahua and HikVision (and their OEMs) for the US government, for US
government-funded contracts and possibly for 'critical infrastructure' and
'national Security’ usage.
US government is
effectively blacklisting Dahua and HikVision products, this will have a severe
branding and consequentially purchasing impact. Many buyers will be concerned
about:
What security risks
those products pose for them
What problems might
occur if they want to integrate with public / government systems
What future
legislation at the state or local level might ban usage of such systems
On Jun 06, 2019
Hanwha Techwin is dropping Huawei Hisilicon from all of their products. Its
belongs to China’s origin. Backdoor entry is open on product.
China's Wuhan
Institute of Virology, the lab at the core of coronavirus. The institute is
home to the China Centre for Virus Culture Collection, the largest virus bank
in Asia which preserves more than 1,500 strains ( https://www.livemint.com/news/world/china-s-wuhan-institute-of-virology-the-lab-at-the-core-of-a-virus-controversy-11587266870143.html
). Result Corona has infected people in 185 countries. Its spread has left
businesses around the world counting the costs. Global economy impact.
Recession increase. Now people avoid to get china factory made product,
electronics goods importing has stopped from china to other country. People
looking for product except china. Now come to Video surveillance, access
control equipment.
The ban that
prohibits the purchase and installation of video surveillance equipment from
Hikvision, Dahua and Hytera Communications in federal installations – passed on
year 2018 National Defense Authorization Act (NDAA). In conjunction with the
ban’s implementation, the government has also published a Federal
Acquisition Regulation (FAR) that outlines interim rules for how it will
be applied moving forward. Like NFPA, now NDAA law accept globally.
Rules outlined in
this FAR include:
- A
“solicitation provision” that requires government contractors to declare
whether a bid includes covered equipment under the act;
- Defines
covered equipment to include commercial items, including commercially
available off-the-shelf (COTS) items, which the rule says, “may have a
significant economic impact on a substantial number of small entities;”
- Requires
government procurement officers to modify indefinite delivery contracts to
include the FAR clause for future orders;
- Extends
the ban to contracts at or below both the Micro-Purchase Threshold
($10,000) and Simplified Acquisition Threshold ($250,000), which typically
gives agencies the ability to make purchases without federal acquisition
rules applying.
- Prohibits
the purchase and installation of equipment from Chinese telecom giants
Huawei and ZTE Corporation. This would also presumably extend to Huawei
subsidiary Hisilicon, whose chips are found in many network cameras;
- And,
gives executive agency heads the ability grant a one-time waiver on a
case-by-case basis for up to a two-year period.
Specifically, NDAA Section
889 creates a general prohibition on telecommunications or video
surveillance equipment or services produced or provided by the following
companies (and associated subsidiaries or affiliates):
- Huawei
Technologies Company; or
- ZTE
Corporation
It also prohibits
equipment or services used specifically for national security
purposes, such as public safety or security of government facilities,
provided by the following companies (and associated subsidiaries or
affiliates):
- Hytera
Communications Corporation;
- Hangzhou
Hikvision Digital Technology Company; or
- Dahua
Technology Company
While the prohibitions
are initially limited to the five named companies, Section 889 authorizes the
Secretary of Defense, in consultation with the Director of National
Intelligence or the Director of the FBI, to extend these restrictions to
additional companies based on their relationships to the Chinese Government.
The prohibitions will take effect for executive-branch agencies on August 13,
2019, one year after the date of the enactment of the 2019 NDAA, and will
extend to beneficiaries of any grants, loans, or subsidies from such agencies
after an additional year.
The provisions of
Section 889 are quite broad, and key concepts are left undefined, such as how
the Secretary of Defense is to determine what constitutes an entity that is
“owned or controlled by, or otherwise connected to” a covered foreign country,
or how the head of an agency should determine whether a component is
“substantial,” “essential,” or “critical” to the system of which it is part.
The statute also fails to address the application of the prohibitions to
equipment produced by U.S. manufacturers that incorporate elements supplied by
the covered entities as original equipment manufacturers (“OEMs”) or other
kinds of supplier relationships.
Section 889 contains
two exceptions under which its prohibitions do not apply:
(1) It allows
Executive agencies to procure services that connect to the facilities of a
third party, “such as backhaul, roaming, or interconnection arrangements.” This
likely means telecommunications providers are permitted to maintain common
network arrangements with the covered entities.
(2) It permits
covered telecommunications equipment that is unable to “route or redirect user
data traffic or permit visibility into any user data or packets” it might
handle, meaning a contractor may still be able to provide services to the
Government so long as any covered equipment provided is unable to interact or
access the data it handles.
Now we come to short process. First of all we need to find
the IP address of the Hikvision device we want to connect too. First of all download
SADP. This program will scan your network for Hikvision devices connected on
your network.
Older Hikvision devices are shipped with a
static IP address of 192.64.0.0, whereas new devices are shipped with DHCP
enabled which means they will automatically be assigned an IP address that
corresponds to your local network. If you're camera is set to a static IP
address you will need to find out what range it needs to be changed to. To find
out your local IP address follow the steps below.
- click
start > control panel
- click
network and internet
- Click
network sharing center
- click
Local area Connection
- Look
at your IPv4 Default Gateway, it is usually either 192.168.1.1 or
192.168.0.1, however it can differ.
Once you know the default gateway you can set a
new IP address for your device. You only want to change the last three
digits of the IP address. I would recommend starting the last three
digits at 100, so you don't conflict with anything else on your network such as
a printer or phone.
If you're not responsible for your network,
make sure to check with your IT department or administrators that the IP
address isn't already taken.
An example of a set IP address would be 192.168.1.100.
Once you know what IP address to set your
device too, you will need the password of the device to set it.
By default the password is 12345 for
Hikvision devices.
For a quick overview of what you should see in
SADP, check the image below. In the example the IP address is 192.168.1.212, this is because we have
a variety of different cameras and devices on our network.
Once all this is set up, your cameras or NVR will be
properly configured with your Local Network. You should be able to go into your
browser and type in the IP address of the camera/NVR, and it will come up with
a log in page.
Getting everything to work in the app
First of all, head on to the play store, as
you need to install the iVMS4500 android app. Once you have downloaded the app,
go ahead and launch it.
The first time you start up the app you will
have to go through a small tutorial, which will show you a variety of cameras
in china. Once the tutorial is over, tap the menu tab in the top right corner
of the app and then tap the devices tab. from here there will be a plus sign in
the top right hand corner. Tap this to add your Hikvision Device.
When you click the plus button you will see the following
screen (Minus some information I have already entered) I will explain the
options further below.
Alias - what you want to call the device
you're adding. Useful for organisation. The alias is exclusive to the app, and
doesn't change any actual camera settings.
Register mode - Set this to IP/Domain to add
the device via it's IP address properly.
Address - The IP address of the device goes
here
Port - usually leave this the same.
Username - admin
Password - 12345
Camera no. - Ignore this part, it will change
depending on what device you are adding.
Tap the floppy Disk Icon to save the device.
Now go back, you will return to the devices
tab. Uncheck the "Hangzhou, China" device, and check the device you
added. From here click live view and you are ready to view your cameras on your
local network.
From this point onwards, you will be able to
view your Hikvision device on your android device, as long as you are on the
same network.
Port-Forwarding,
and accessing your devices from anywhere
If you want to access your cameras, or NVR
remotely (From anywhere) You will need to have the devices port-forwarded.
Port-forwarding is different for each router, but the ports that must be opened
remain the same. For more information on Port-Forwarding, and a guide on how to
set up your specific router, please head tohttp://portforward.com/.
When port forwarding a Hikvision camera, the
ports that should be opened are
Port 80 - HTTP Protocol
Port 8000 - Client Software Port
Port 554 - RTSP Port
Port 1024 - 3G/4G Port, for access via a 3G or
4G mobile connection
Once you have successfully port forwarded your
Hikvision device, follow the steps above, relevant to the OS you're using, and
then insert the port-forwarded address of the device where the IP option goes.
This view may be slightly choppier, it depends
on the speed of your current internet connection.
Q. What is the
driving issue behind the National Defense Authorization Act (NDAA),
formerly known as
HR5515?
A.
Cybersecurity
concerns. In particular, cybersecurity of telecommunications and video surveillance
products from specific companies that have deep relationships with a “covered
foreign country” government, the People’s Republic of China.
Q.The named companies
that are banned by the NDAA are based in China. Does the NDAA ban all video
surveillance and telecommunications products and components made in China?
A: No. The NDAA does
not ban all products and components that are designed or manufactured in China.
As per NDAA Section
889, f – definitions, 3 – Covered Telecommunications [and Video Surveillance]
Equipment or Services, items A through D calls out specifically-named companies
“that the Secretary of Defense, in consultation with the Director of the
National Intelligence or the Director of the Federal Bureau of Investigation,
believes to be an entity owned or controlled by, or otherwise connected to, the
government of a covered foreign country [The People’s Republic of China]”.
Hence, the NDAA does
not ban products manufactured in China by companies that are headquartered and
owned by entities that are not based in China.


