we will assign your surveillance DVR an IP address. Make sure that your DVR is connected to your network by attaching an ethernet cable to the back of your DVR and attaching the other end to your router.
1. Login
to your DVR by pressing the menu button on the DVR or on the wireless remote
control.
2. When
you are prompt to enter a password, just press the OK button on the DVR or
remote. The default admin password for the DVR is blank. If you
have already setup an admin password for your DVR, then enter this, then press
OK.
3. From
your DVRs System menu, select External Device.
4. On
the External Device menu, select TCP/IP Setup.
5. On
the TCP/IP Setup screen, select DHCP setup and press enter.
6. On the DHCP setup screen, confirm that the DHCP mode
is set to automatic. If it is not, adjust it so that it is by pressing
the OK button.
7. Select
Detect IP and press enter. The screen should refresh and populate values
below. Note the IP address. This is the internal IP address that
your router has assigned to your DVR. This is the IP address that you
will setup port forwarding for.
8. After
you have noted this IP address, select DHCP Mode and press OK. The mode
will be changed Manual. This will ensure that your DVR will always be
assigned the same IP address from your router. THIS IS IMPORTANT because
if you loose power to your router, your router may assign your DVR a difference
IP address and you will no longer be able to access the DVR remotely.
9. Press
the menu button once to return to the TCP/IP setup screen.
10. On
the TCP/IP setup screen, select IP config setup and press enter. On the
IP config setup screen, confirm the port number of your DVR as seen
below. The default port is 8000. If your DVR is not set to port
8000, please edit this value to set to 8000. NOTE: please ignore that the
below screen shot shows port 50000. Port 50000 was used for the last
version of the JPEG DVR.
Since most businesses and many households have local area
networks (LANs), you will find the task of connecting a security DVR to a LAN
is a common procedure. While it is a relatively simple thing for most security
equipment installers, it is complex enough to confuse many users, especially
users who have never worked with IP numbers before or have never worked with LAN
topology.
Let's begin by identifying your LAN topology. To do this,
locate your
1) security DVR,
2) the router attached to your security DVR and
3) a computer/workstation that is attached to the same
router. It can also help if you locate
4) the modem (or router AND modem) that
connects to the internet outside your home or facility - it is usually the
first piece of hardware attached to the internet cable the comes through the
wall. If you don't have #3 (computer attached to the same router shared by your
security DVR), create one now and verify that the PC/workstation has a working
connection. If you can't find or locate #4 (modem that provides connection to
the internet) don't worry about it at this point since locating it may not be
necessary.
Some typical network topologies are shown below. Figure
#1 represents a simple network topology you might find in small business, while
figure #2 represents a very simple network you would find in many homes.
(Figure #2 actually represents the bare minimum hardware & connections you
need for remote DVR monitoring/programming.).
Make sure (verify) your network connection is active and
your PC can connect to the internet without any problems. Start at your PC and
do the following:
1. Go to the COMMAND PROMPT. Different Windows versions
have different ways of getting a COMMAND PROMPT. Most Windows versions let you
reach a command prompt by going to START, then RUN, then type CMD into the
window and hit ENTER. If successful you'll see a screen similar to Figure 3.
2. Figure 3 shows a computer screen with the
command prompt, and the PROGRAM FILES folder is open. That location should be
fine. Type IPCONFIG/ALL and hit ENTER. You should see a display screen
similar to Figure 4.
( If you DON'T see Figure 4, they you are
probably getting an error message. You'll need to find the person who installed
your OS and find out why it doesn't have essential DOS files - you won't be
able to continue this procedure without them.)
IPCONFIG is a standard Microsoft DOS command. You can
read all about it at the official Microsoft website
(http://technet.microsoft.com/en-us/library/bb490921.aspx), if you want. When
you use this command as described here, it will report the computer's IP
numbers so you can record them for your records. It does NOT change any
settings or perform any kind of configuration process.
3. Write down the IP numbers shown under
IP ADDRESS (192.168.1.100),
SUBNET MASK (255.255.255.0),
GATEWAY (192.168.1.1) and
DNS SERVERS (206.222.98.82, 216.199.46.11, 206.222.98.82
- this particular computer has 3 DNS SERVER connections) and label them.
NOTE: Some versions of MS Windows will
display IPv4 ADDRESS and an IPv6 ADDRESS - you want to use the IPv4 ADDRESS
numbers.
4. Now get the IP Address of the security DVR. Got to the
VRR andaccesssthe programing menu and get to the NETWORK settings area. Find
the option that says DHCP (Dynamic Host Configuration Protocol) and ENABLE it..
5. Still at the DVR, write down the IP addresses it shows
in the DHCP screen. Now turn OFF DHCP (or DISABLE it). If the IP addresses
shown did not change, go to the next step. IF THEY DID CHANGE, re-enter them in
the fields shown (DO NOT enable, or turn on, DHCP again).). If the IP addresses
shown did not change, go to the next step. IF THEY DID CHANGE, re-enter them in
the fields shown (DO NOT enable, or turn on, DHCP again).
6. Note the PORT NUMBERS shown in the DVR
NETWORK screen. Write them down.
7. Test your configuration. Do the following at
the PC/workstation that shares the same router as your DVR:
· Get to the COMMAND PROMPT.
· Type PING [IP Address], hit ENTER. (In
our example the IP address is 192.168.1.100)
· If you get a REPLY message, it communicated. If
not, and you got a TIME OUT message of any kind then check your settings.
8. Your DVR has CLIENT SOFTWARE or REMOTE
VIEWING SOFTWARE that was included in the box. Locate it and install it on the
PC/workstation.
· If your DVR has a webserver you can use IE
Browser to communicate with the DVR - just type in the DVR IP Address in the
URL bar of the browser.
Port Forwarding
& Accessing Your DVR from Outside Your Network
To set up external (remote) viewing of your DVR and attached
cameras, you will need to access your router. Refer to the router's User Manual
to learn how to set port forwarding. If you can't find it, look here http://www.portforward.com/english/routers/port_forwarding/routerindex.htm. All routers have a different method of
setting up port forwarding so it's impossible to instruct you here.
Program the router so that when it gets an internet request
for the IP ADDRESS of the DVR it will refer (or activate) to the PORT NUMBER of
the DVR (you wrote these numbers down earlier, right?). Normally most routers
have a field for each physical connection and it will be obvious where to place
the IP and PORT NUMBER information. If you can't find how to access your
router, look at the router closely and make sure it is indeed a router and NOT
a switcher. It should be ok if it's labeled ROUTER/SWITCHER but if it is an
older piece of hardware and just says SWITCHER, discard it and get a true
ROUTER.
Test the connection from an network external location. If the
IP numbers and Port Forwarding numbers are set correctly you should be able to
receive streaming video.
Using IE Browser
VS Client/Remote Viewing Software
If the DVR has a webserver, then you can use IE Browser to
connect to the DVR. Put the DVR IP address in the URL bar of the browser (like http://192.168.100.200,
etc).
If the DVR does NOT have a webserver, then you will need to
install the client/remote viewing software (that came with the DVR) on the
PC/workstation you are using to view your security installation. The Client
Software (or Remote Viewing Software) gives you additional features, such as
ability to program motion detection, etc., that the IE Browser can not provide.
Since each surveillance DVR has it's own client software, you'll have to refer
to the software manual for help using their software.
 |
| Add caption |
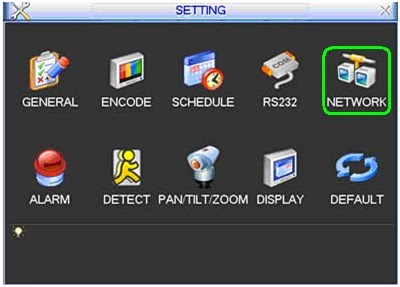
 2. Select Setting
 3. Select Network
 4. Check the box
next to DHCP and click Save
4. Check the box
next to DHCP and click Save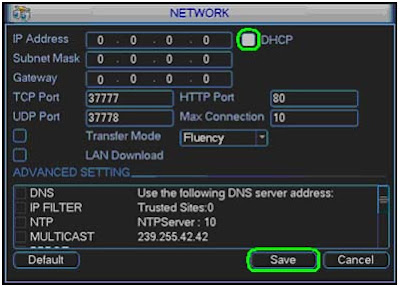 5. Select Shutdown
 6. Set to Restart
system and click OK
6. Set to Restart
system and click OK
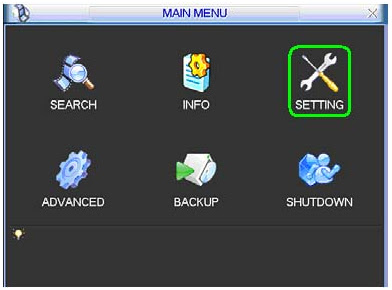
 7. Right Click and
select Main Menu (Now we are Identifying the IP
address) Then Select Settings, Then Select Network.
7. Right Click and
select Main Menu (Now we are Identifying the IP
address) Then Select Settings, Then Select Network.
 8. Uncheck the box next
to DHCP, write down the IP Address, Subnet Mask, and Gateway, and click
Save
8. Uncheck the box next
to DHCP, write down the IP Address, Subnet Mask, and Gateway, and click
Save