How to Integrate Your Gaming PC with Home Surveillance CCTV
Suppose
you are deep into your gaming zone with headphones on. The sound of a knock on
the door or someone breaking into your home is impossible to hear. Well, you
need a home surveillance CCTV system. Simply install and incorporate cameras into
your existing gaming PC setup to make your home secure.
Protecting
your gaming setup and improving alertness about the surroundings can put a lot
of gamers’ minds at ease. Gaming is a strict business. You must put in skill
and concentration to take your game account to new heights.
A simple
task such as ordering a pizza can engage your mind in constantly hearing the
doorbell or ringing phone. A gamer can easily avoid constant loss of
concentration through overlay video of a camera. To learn more about
integrating your gaming PC with CCTV, read on!

Integrating Gaming PC with CCTV
Let’s start with the basics. We will use an offline setup for gamers to emphasize the concept of a closed-circuit system. In addition, we will mention methods gamers can use to broadcast their camera feed to the internet. It will make it accessible from anywhere in the world. To start the integration process, you will need a set of items. Let’s move step-by-step:
Step 1: Choose the Right CCTV Cameras
CCTV
cameras come in various shapes, sizes, and technical capabilities. We typically
recommend an IP CCTV camera for gamers in a home configuration. It will provide
a crisp video with details ideal for a small-scale setup. There are wireless
versions of IP CCTV cameras, but they are prone to interference, which can
cause stuttering video or audio. In a surveillance setup, having a wired
connection alongside an on-camera SD card recording is the best option.
Connecting an IP CCTV camera with the internet and offline setup is easy. They can provide up to 4K resolution depending on the requirement. Furthermore, users can opt for a camera with a microphone to receive live audio. They only need a RJ45 ethernet connection for data and a power source. However, you will not need two cables running throughout the house for the camera. A single RJ45 cable will suffice. We will explain how to achieve that in the next step.
Step
2: Collecting
Necessary CCTV Surveillance Items
After you
decide which camera is best for your setup, we can move on to the other items.
Here is a list of things for a home surveillance CCTV setup:
·
Cameras: The number of cameras will
depend on the number of places you want to perform surveillance. It will serve
as a basis for the items next in line.

·
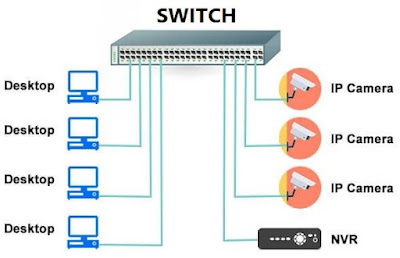
PoE
Switch: After
deciding the number of cameras, you need a PoE (Power over Ethernet) switch. It
will serve as the basis for providing power and transmitting your video to the
gaming PC. Usually, people set it up near the computer, and its ports should
equal the number of cameras plus one port for computer/router connection.

·
PoE
Injector and Splitter: A
typical IP CCTV camera requires coaxial power and network cable. A PoE injector
and splitter will convert a simple ethernet cable to a coaxial power cable and
data transmitting connection. Just ensure that they are IEEE 802.3at/aft
compatible.

·
Ethernet
Cable: The whole
system communicates using the ethernet cable. Calculate the distance between
the camera and the PoE switch after routing. There are various categories of
ethernet cable available. Their price depends on the quality. We recommend
using a Cat5e for its price/performance ratio. Anything above the Cat5e grade
is also compatible.
**Note: A typical setup will have a line
running underneath the carpet alongside the edges of the wall. Make sure to
take proper measurements.

·
Router: You will need a router to
connect the complete setup to the internet and ensure your PC remains
connected. If you are an online gamer, then you own one. We will explain how to
connect all the pieces and make them start working.

Step 3: Camera Placement
Strategically
placing your camera is essential. Ensure it is not easily
accessible, and you can route the wire hidden away from eyesight. Following are
some of the areas where you can place your camera for surveillance:
·
Front
Door Entrance
·
Back
Door Entrance
·
Vulnerable
Windows
·
Garage
·
Drive
Way
·
Hallway
·
Common
Rooms
The areas might not relate to your setup, but be sure to cover maximum entrances. Observe where you can mount the camera for complete and precise coverage.
Step 4: Complete the CCTV Setup
Let’s
start connecting all the puzzles. Before we mount the camera in their
respective location, check connections and equipment healthiness by performing
a test. Complete the following process to complete your CCTC setup.
1.
Connect
your PoE switch to the power outlet and ensure the lights are on.
2.
Now
connect the ethernet cable in one of the ports of the PoE switch and connect
the other end to a PoE injector and splitter.
3.
Now
take a camera and connect its wires with the PoE injector and splitter. Your
camera will now have power.
4.
Take
a new ethernet cable, insert it into one of the ports on the PoE switch, and
connect the other end with the computer router. Make sure you plug in your
gaming PC to the same router.
5.
Download
and install the software from the camera manufacturer’s
website. Follow the instruction to access your camera live feed.
6.
You
have successfully tested your equipment if you can see the live feed.
7. As the last step, install your CCTV cameras at their designated location, route the cable, and complete the setup.
Step 5: Start Monitoring CCTV with Gaming PC
Now that
you have connected all your equipment let’s obtain the live video feed from
your cameras and place an overlay on your favorite game. You will need a decent
graphics card and Windows or MacOS computer.
1.
We
will be using the VLC media player. Download and install the latest version. It
is free to use.
2.
You
will be accessing the camera through its IP address. It is usually written and
provided by the manufacturer. Check the website or instruction manual.
3.
Start
VLC media player.
4.
Navigate
to Media > Open Network Stream
5.
Now
type the address to your camera with the following settings
rtsp://admin:a1B2c4@192.168.1.5
·
Note
that in the address given above, the camera username is (admin), the password
is (a1B2c4), and the IP address is (192.168.1.5). Everything else will remain
the same.
·
After
you enter, you will start streaming your IP CCTV camera.
·
Now,
right-click on the live stream, navigate to view, and always click on top.
·
Right-click
on the live stream and navigate to view. Now click minimal interface.
·
Now
you will have a constant stream on top of all your games.
Note: To view your surveillance streams live from anywhere around the world. Follow the camera manufacturer’s guidelines to enable the online setup. The process is easy to follow once you connect the PC to the internet router.
Conclusion:
There are
tons of benefits of having a live stream over your gaming sessions. It improves
spatial awareness and helps gamers concentrate on their gaming ventures. The
gaming industry has reached a whopping $385 billion and still growing. It is
logical to find your share within the broad field. A home surveillance CCTV can
provide the comfort of security for gamers. What better than having a live view
of your surroundings while gaming?
The
process is easy, and anyone with a basic knowledge of computers can put a
system together. To save time, you can order a pre-configured setup from an
online website to immediately set up your surveillance. At last, we hope you
find value in our article. So set up your watch and get gaming!