Difference between Hub and Switch
Network
devices, or networking hardware, are physical devices that are required for
communication and interaction between hardware on a TCP/IP network.
Here
is the common network device list:
·
Hub
·
Switch
·
Router
·
Bridge
·
Gateway
·
Modem
·
Repeater
·
Access
Point

In
2006 The Network Hub is invented at Vancouver, British Columbia, Canada. A hub
is a device that connects multiple Ethernet devices on one network and makes
them act together as a single network. A hub does not gather information and
input in one port results as an output in all ports on the network. A switch is
a networking device that performs the same job as the hub but are considered as
a more intelligent hub as it gathers information about the data packets it
receives and forwards it to only the network that it was intended for. A Hub is
a layer-1 device and operates only in the physical network of the OSI Model.

Hubs
and switches are devices that are used in data networking on the internet.
These devices are used in order to connect two or more networking ports in
order to transfer data along the connection. Though the primary job of hubs and
switches are the same, to forward data to different networks, they work in
different ways.

A hub,
also known as Ethernet hub, active hub, network hub, repeater hub or multiport
repeater, is a device that connects multiple Ethernet devices on one network
and makes them act together as a single network. A hub has multiple
input/output (I/O) ports, in which an input in one port results in it being an
output in all the other ports, except the port where it was input. In layman’s
terms, a hub connects many networks into one, where a data packet that is sent
by one networks, is copied and pasted to all network ports, making it so that
every port can see that data packet. A hub works on the physical layer or layer
1 of the Open Systems Interconnection (OSI) model. It also works as a data collision
detector, sending a jamming signal to all ports if it detects collisions at one
port.

It is
a simple device that does not examine the data it receives or sends, while just
duplicating the data and making it visible for all. The receiving port that has
to decide if the data packet is actually intended for it by checking the
address on the packet, before passing it on further. Since hubs only have one
collision domain, constant collisions occur. Unnecessary traffic is sent to all
devices on the network. Originally hubs were popular due to the high price of
switches, but switches are not so expensive these days. Hubs are slowly
becoming obsolete in many practices, but are still used in special
circumstances.

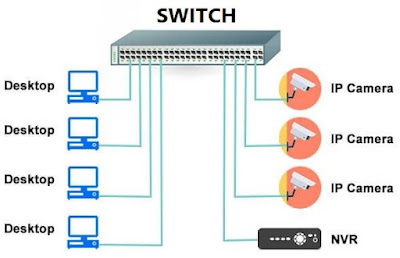
A
switch is a networking device that performs the same job as the hub; it
connects network segments or devices making them act as a single network.
Switches are commonly referred to as a multi-port network bridge that process
and routes data on a data link layer or layer of the OSI model. Switches can
also process data at the network layer (layer 3) or higher layers and are known
as multilayer switches.

Switches
are considered as a more intelligent hub as it gathers information about the
data packets it receives and forwards it to only the network that it was
intended for. When a switch receives a data packet, it examines the data
address, the sender and the receiver and stores the memory, after which it then
sends the data to the device that the data is meant for.

Most
modern Ethernet Local Area Networks (LANs) operate on switches. Small offices
and residential devices commonly use single layer switch, while bigger
applications require multilayer switches. The switches use a bridge or a router
in order to split a larger collision domain to smaller collision domains,
resulting in lesser collisions. Each port has an individual collision
domain, allowing computers to maintain dedicated bandwidth.

|
Hub |
Switch |
|
|
Definition |
A hub is a connection point for different segments of a LAN. It
contains multiple ports and when it receives a packet of information at one
port, it copies this packet to all segments of the LAN so that it can be
viewed by all ports. |
A switch is multi-port networking device that connects network
devices together. A switch operates at the data link layer (layer 2) of the
OSI model. A switch filters and then forwards data packets between networks. |
|
Layer |
Physical Layer (Layer 1) |
Data Link Layer (Layer 2) |
|
Spanning-Tree |
No Spanning-Tree |
It allows many Spanning-Trees to take place. |
|
Type of
Transmission |
Broadcast |
Broadcast, Uni-cast & Multicast. |
|
Table |
No MAC table. Hubs cannot learn MAC address. |
Stores MAC address and maintains address. |
|
Used in |
LAN (Local Area Networks) |
LAN (Local Area Networks) |
|
No of
Ports |
4 |
24-48 depending on type of switch. |
|
Collision |
Occurs |
No collision occurs |
|
Collision
Domain |
One collision domain |
Every port has its own collision domain. |
|
Transmission
Mode |
Half duplex |
Full duplex |
Types
of Hub
There are three
types of the hub that are given below:
1.
Passive Hub
2.
Active Hub
3. Intelligent Hub
Passive Hub: The passive hubs are the connection point for wires that helps to make the physical network. It is capable of determining the bugs and faulty hardware. Simply, it accepts the packet over a port and circulates it to all ports. It includes connectors (10base-2 port and RJ-45) that can be applied as a standard in your network. This connector is connected to all local area network (LAN) devices. Additionally, the advanced passive hubs have AUI ports, which are connected as the transceiver according to the network design.
Active Hub: As
compared to a passive hub, it includes some additional features. It is able to
monitor the data sent to the connected devices. It plays an important role
between the connected devices with the help of store technology, where it
checks the data to be sent and decides which packet to send first.
It has the ability to fix the damaged packets when packets are sending, and also able to hold the direction of the rest of the packets and distribute them. If a port receives a weak signal, but still it is readable, then the active hub reconstructs the weak signal into a stronger signal before its sending to other ports. It can boost the signal if any connecting device is not working in the network. Therefore, it helps to make the continuity of services in LAN.
Intelligent Hub: It is a little smarter than passive and active hubs. These hubs have some kinds of management software that help to analyze the problem in the network and resolve them. It is beneficial to expend the business in networking; the management can assign users that help to work more quickly and share a common pool efficiently by using intelligent hubs. However, it offers better performance for the local area network. Furthermore, with any physical device, if any problem is detected, it is able to detect this problem easily.
The
important applications of a hub are given below:
·
Hub is used to create small home networks.
·
It is used for network monitoring.
·
They are also used in organizations to provide connectivity.
·
It can be used to create a device that is available thought out of
the network.
Advantages of Hub
1. It provides support for
different types of Network Media.
2. It can be used by anyone as it
is very cheap.
3. It can easily connect many
different media types.
4. The use of a hub does not
impact on the network performance.
5. Additionally, it can expand the total distance of the network.
Disadvantages of Hub
1. It has no ability to choose the
best path of the network.
2. It does not include mechanisms
such as collision detection.
3. It does not operate in
full-duplex mode and cannot be divided into the Segment.
4. It cannot reduce the network
traffic as it has no mechanism.
5. It is not able to filter the
information as it transmits packets to all the connected segments.
6. Furthermore, it is not capable
of connecting various network architectures like a ring, token, and ethernet,
and more.